

There have been asks around creating SQL server instance types within Morpheus. To show another example of utilizing Morpheus to create a full server + application, please enjoy this quick doc for SQL creations!
Morpheus Vocabulary
I’m going to steal some of this verbatim from previous posts of mine for a refresher. We will include a few additional concepts from Morpheus that you’ll need to build on as well.
The instances your user’s can deploy are defined/created under Provisioning > Library. Here the sub-headers are Instance Types, Layouts, Node Types, Options Types, Option Lists, File Templates, and Scripts. Let’s quickly run through what these mean before we begin making our own.
- Instance Types – The catalog items users can consume when deploying VMs and Containers. Blueprints are made of 1 or more Instance Types.
- Layouts – Alerternate configurations within an Instance Type. Examples are a WordPress Instance Type, but 1 layout is “WP on Ubuntu” and another is “WP on CentOS”. Layouts can also point to different cloud options, allowing multiple placement options for the end user.
- Node Types – Pointers to specific Virtual Images (templates/ISOs/etc). These are consumed by Layouts.
- Option Types – Captured fields during provisioning. User input such as text boxes, passwords, drop downs, or a checkbox.
- Option Lists – Static or Rest lists for drop down Option Types.
- File Templates – Configuration/Application files that should interpret Morpheus variables and upload to completed machines. An example is a server config that you want to pass hostname/IP or any captured values from users into the file.
- Scripts – This area allows for native PowerShell and Bash scripting that can execute locally on the machines created.
Additionally, I will be targeting a few services within Morpheus.
- Cypher – At its core is a secure Key/Value store. But what makes cypher useful is the ability to securely store or generate credentials to connect to your instances. Not only are these credentials encrypted but by using a cypher you don’t have to burn in connection credentials between instances into your apps.
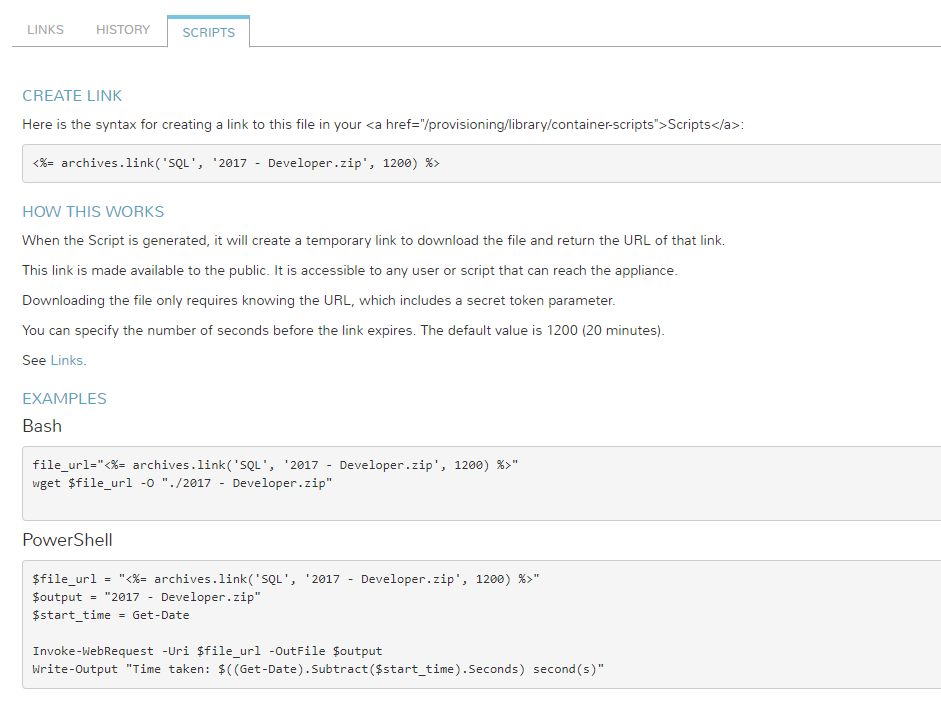
- Archives – Archives provides a way to store your files and make them available for download by your Scripts and Users. Archives are organized by buckets. Each bucket has a unique name that is used to identify it in URLs and Scripts.
Defining the Options, Files, and Scripts
Before we make the Instance Type, it’s easier to create some of the items ahead of time. There will be fields we ask users (Option Types). Installer files we will upload to Morpheus managed storage. And Lastly, creating the script(s) that Morpheus will call on provision.
-
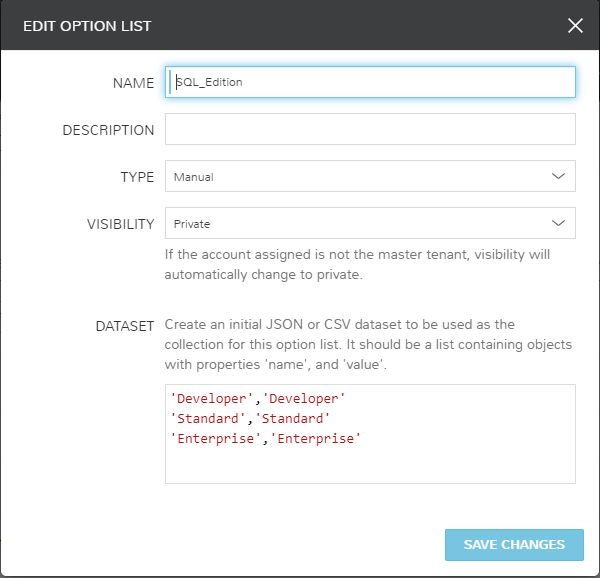
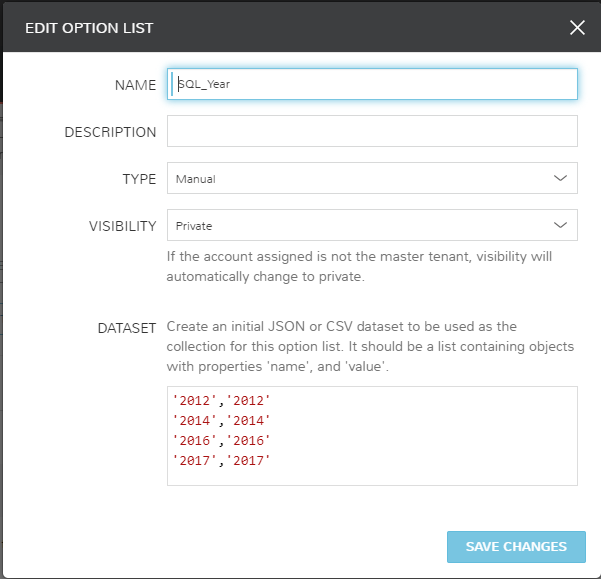
Create Option Lists
First we must create the Option Lists that present selectable drop downs. These can be manually defined drop down lists, or we can utilize REST calls for dynamically built lists. Navigate to Provisioning > Libary > Option Lists and create the following drop down choices:
-
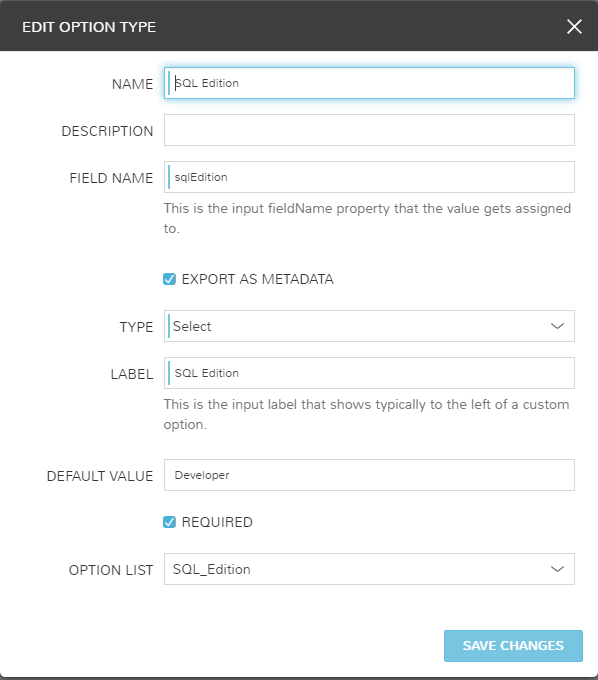
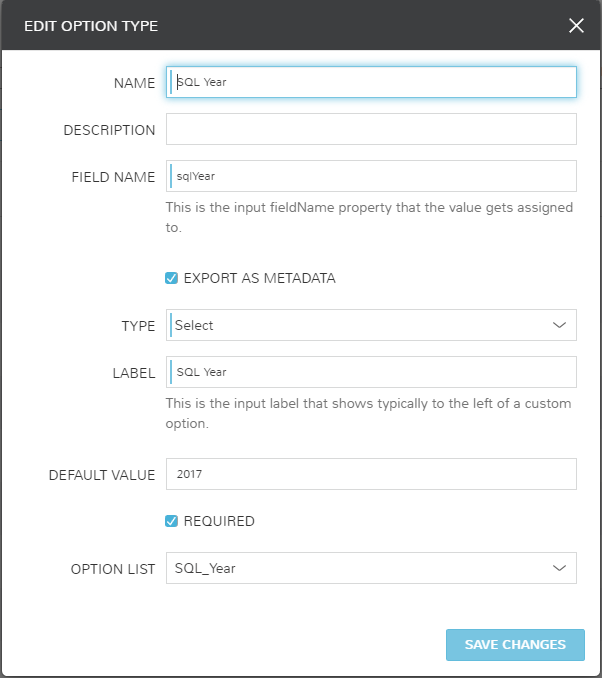
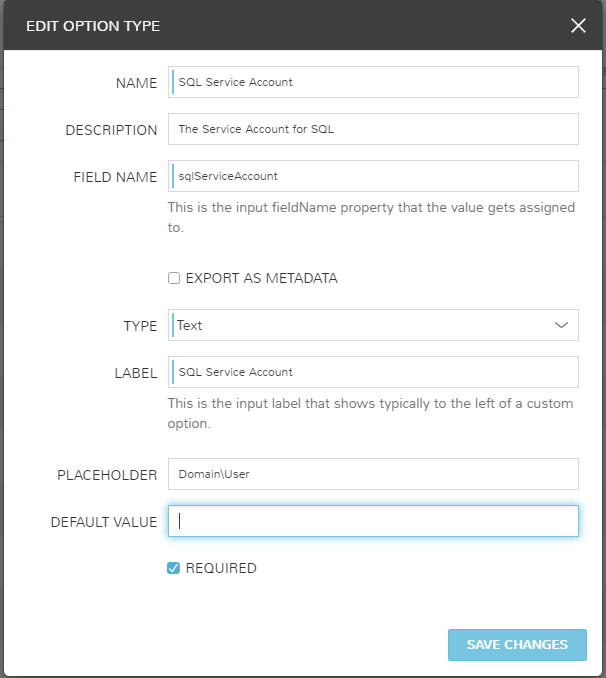
Create Option Types
Next we must create the Option Types that will prompt users for input. Navigate to Provisioning > Libary > Option Types and create the following. Note that 2 of these items will link back to the Option Lists we just created. To reference Option Types in scripts later, we will utilize the entry in the “Field Name”:
-
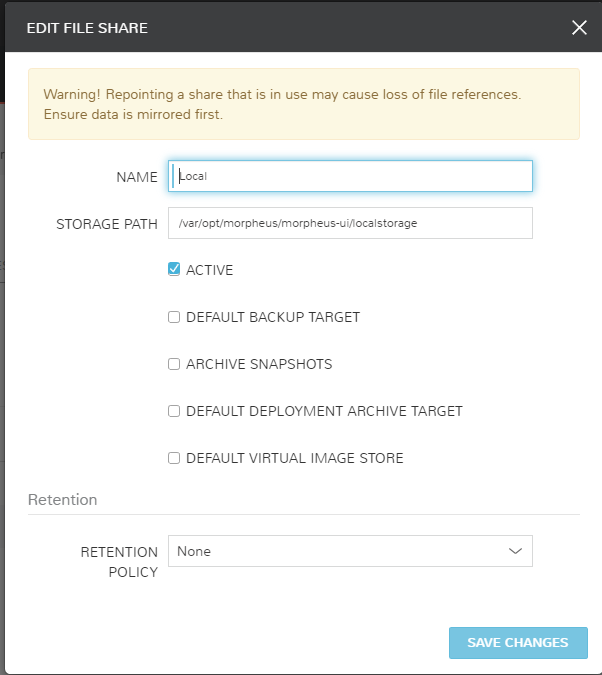
Create an Archive Storage Location
Now let’s point to a storage fileshare for Archive purposes. Navigate to Infrastructure > Storage > Fileshares. In this case, I will point to a local mount on the Morpheus appliance. This can be other locations or even specific buckets if you desire.
-
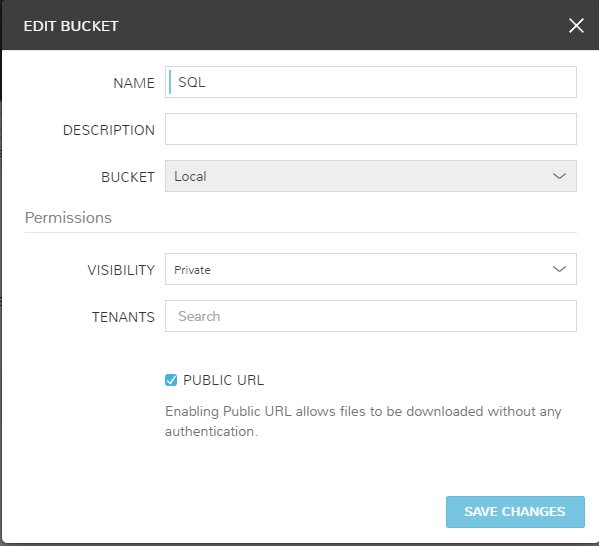
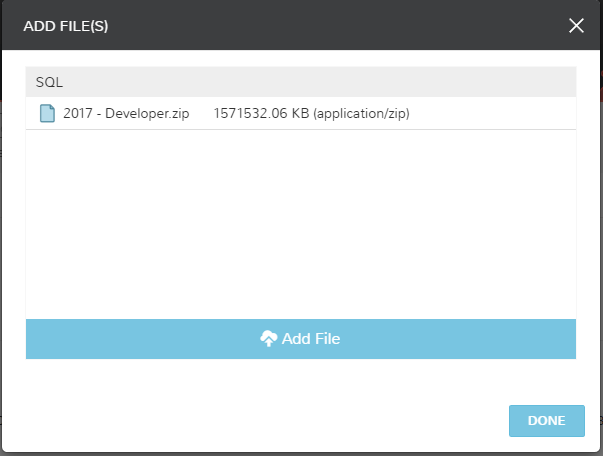
Upload Installers to Archives
Now upload the files to the Fileshare previously defined. To do this navigate to Services (soon to be named Tools) > Archives. From here create the Archive and define if you want it public (no Morpheus authentication needed) or keep it private. After the Archive is created, click the name to navigate inside, then add the file(s) desired. In my example I will upload a zip of the SQL 2017 Developer files by clicking and dragging a folder called SQL into the upload box.
-
Input SQL Installer Script
I grabbed this SQL install script online and added logic to handle my user Option Types. SQL install scripts are readily available online so I grabbed the first that met my needs. Other scripts could define specific install mounts for example. Under Provisioning > Library > Scripts, create the following PowerShell script:
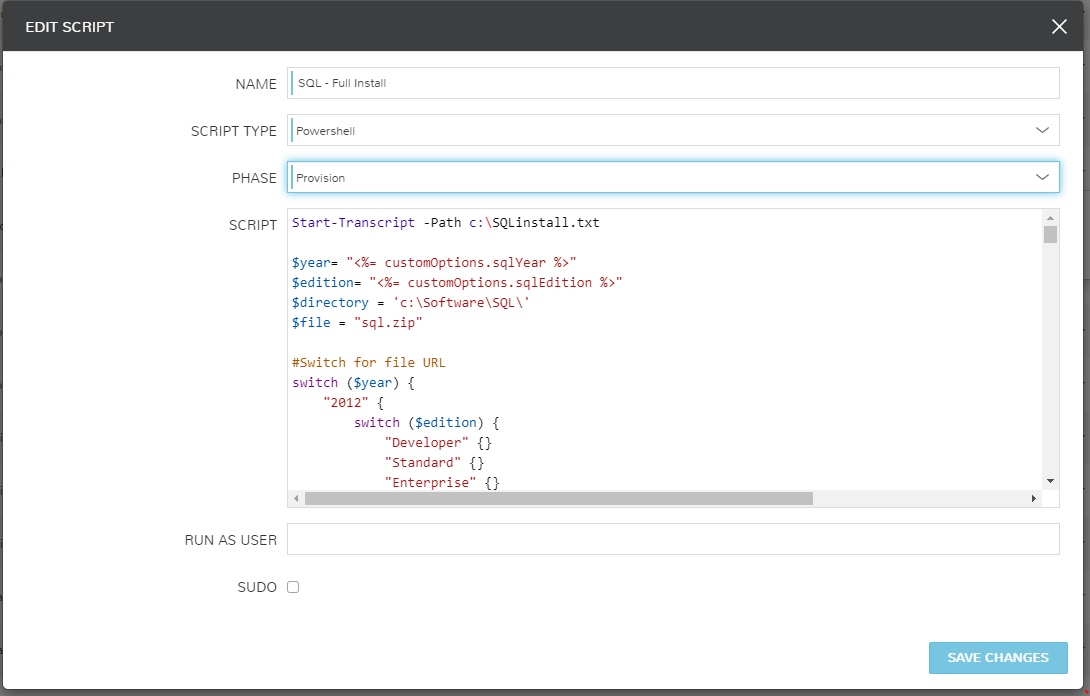
Notice in the code below how I’m calling my Morpheus Option Types. The advantage of Morpheus is the power behind passing variables to generalize your scripts for multiple installations. Information on consuming variables can be found through the documentation at https://docs.morpheusdata.com
$ProgressPreference = "SilentlyContinue"  #Prevents the unzip from overloading log

$year= "<%= customOptions.sqlYear %>"
$edition= "<%= customOptions.sqlEdition %>"
$directory = 'c:\Software\SQL\'
$file = "sql.zip"

#Switch for file URL
switch ($year) {
    "2012" {
        switch ($edition) {
            "Developer" {}
            "Standard" {}
            "Enterprise" {}
            }
        }
    "2014" {
        switch ($edition) {
            "Developer" {}
            "Standard" {}
            "Enterprise" {}
            }
        }
    "2016" {
        switch ($edition) {
            "Developer" {}
            "Standard" {}
            "Enterprise" {}
            }
        }
    "2017" {
        switch ($edition) {
            "Developer" {
                $file_url = "<%= archives.link('SQL', '2017 - Developer.zip', 1200) %>"
                }
            "Standard" {}
            "Enterprise" {}
            }
        }

    }

#Make Installer Location
mkdir $directory -ErrorAction SilentlyContinue -Force

Set-Location $directory

#Download File
Invoke-WebRequest -Uri $file_url -OutFile ($directory + $file)

#Extract Zip
Expand-Archive -LiteralPath ($directory + $file) -DestinationPath $directory

# below variables are customizable
$folderpath="$directory"
$inifile="$folderpath\ConfigurationFile.ini"
# next line sets user as a SQL sysadmin
$yourusername="<%= customOptions.sqlServiceAccount %>"
# path to the SQL media
$SQLsource="$directory"
$SQLInstallDrive = "C:"
# SQL memory
$SqlMemMin = 2048
$SqlMemMax = 4096
# configurationfile.ini settings https://msdn.microsoft.com/en-us/library/ms144259.aspx
$ACTION="Install"
$ASCOLLATION="Latin1_General_CI_AS"
$ErrorReporting="False"
$SUPPRESSPRIVACYSTATEMENTNOTICE="False"
$IACCEPTROPENLICENSETERMS="False"
$ENU="True"
$QUIET="True"
$QUIETSIMPLE="False"
$UpdateEnabled="True"
$USEMICROSOFTUPDATE="False"
$FEATURES="SQLENGINE,RS,CONN,IS,BC,SDK"
$UpdateSource="MU"
$HELP="False"
$INDICATEPROGRESS="False"
$X86="False"
$INSTANCENAME="MSSQLSERVER"
$INSTALLSHAREDDIR="$SQLInstallDrive\Program Files\Microsoft SQL Server"
$INSTALLSHAREDWOWDIR="$SQLInstallDrive\Program Files (x86)\Microsoft SQL Server"
$INSTANCEID="MSSQLSERVER"
$RSINSTALLMODE="DefaultNativeMode"
$SQLTELSVCACCT="NT Service\SQLTELEMETRY"
$SQLTELSVCSTARTUPTYPE="Automatic"
$ISTELSVCSTARTUPTYPE="Automatic"
$ISTELSVCACCT="NT Service\SSISTELEMETRY130"
$INSTANCEDIR="$SQLInstallDrive\Program Files\Microsoft SQL Server"
$AGTSVCACCOUNT="NT AUTHORITY\SYSTEM"
$AGTSVCSTARTUPTYPE="Automatic"
$ISSVCSTARTUPTYPE="Disabled"
$ISSVCACCOUNT="NT AUTHORITY\System"
$COMMFABRICPORT="0"
$COMMFABRICNETWORKLEVEL="0"
$COMMFABRICENCRYPTION="0"
$MATRIXCMBRICKCOMMPORT="0"
$SQLSVCSTARTUPTYPE="Automatic"
$FILESTREAMLEVEL="0"
$ENABLERANU="False"
$SQLCOLLATION="SQL_Latin1_General_CP1_CI_AS"
$SQLSVCACCOUNT="NT AUTHORITY\System"
$SQLSVCINSTANTFILEINIT="False"
$SQLSYSADMINACCOUNTS="$yourusername"
$SQLTEMPDBFILECOUNT="1"
$SQLTEMPDBFILESIZE="8"
$SQLTEMPDBFILEGROWTH="64"
$SQLTEMPDBLOGFILESIZE="8"
$SQLTEMPDBLOGFILEGROWTH="64"
$ADDCURRENTUSERASSQLADMIN="True"
$TCPENABLED="1"
$NPENABLED="1"
$BROWSERSVCSTARTUPTYPE="Disabled"
$RSSVCACCOUNT="NT AUTHORITY\System"
$RSSVCSTARTUPTYPE="Automatic"
$IAcceptSQLServerLicenseTerms="True"

# do not edit below this line

$conffile= @"
[OPTIONS]
Action="$ACTION"
ErrorReporting="$ERRORREPORTING"
Quiet="$Quiet"
Features="$FEATURES"
InstanceName="$INSTANCENAME"
InstanceDir="$INSTANCEDIR"
SQLSVCAccount="$SQLSVCACCOUNT"
SQLSysAdminAccounts="$SQLSYSADMINACCOUNTS"
SQLSVCStartupType="$SQLSVCSTARTUPTYPE"
AGTSVCACCOUNT="$AGTSVCACCOUNT"
AGTSVCSTARTUPTYPE="$AGTSVCSTARTUPTYPE"
RSSVCACCOUNT="$RSSVCACCOUNT"
RSSVCSTARTUPTYPE="$RSSVCSTARTUPTYPE"
ISSVCACCOUNT="$ISSVCACCOUNT"
ISSVCSTARTUPTYPE="$ISSVCSTARTUPTYPE"
ASCOLLATION="$ASCOLLATION"
SQLCOLLATION="$SQLCOLLATION"
TCPENABLED="$TCPENABLED"
NPENABLED="$NPENABLED"
IAcceptSQLServerLicenseTerms="$IAcceptSQLServerLicenseTerms"
"@


# Check for Script Directory & file
if (Test-Path "$folderpath"){
 write-host "The folder '$folderpath' already exists, will not recreate it."
 } else {
mkdir "$folderpath"
}
if (Test-Path "$folderpath\ConfigurationFile.ini"){
 write-host "The file '$folderpath\ConfigurationFile.ini' already exists, removing..."
 Remove-Item -Path "$folderpath\ConfigurationFile.ini" -Force
 } else {

}
# Create file:
write-host "Creating '$folderpath\ConfigurationFile.ini'..."
New-Item -Path "$folderpath\ConfigurationFile.ini" -ItemType File -Value $Conffile

# Configure Firewall settings for SQL

write-host "Configuring SQL Server 2017 Firewall settings..."

#Enable SQL Server Ports

New-NetFirewallRule -DisplayName "SQL Server" -Direction Inbound –Protocol TCP –LocalPort 1433 -Action allow
New-NetFirewallRule -DisplayName "SQL Admin Connection" -Direction Inbound –Protocol TCP –LocalPort 1434 -Action allow
New-NetFirewallRule -DisplayName "SQL Database Management" -Direction Inbound –Protocol UDP –LocalPort 1434 -Action allow
New-NetFirewallRule -DisplayName "SQL Service Broker" -Direction Inbound –Protocol TCP –LocalPort 4022 -Action allow
New-NetFirewallRule -DisplayName "SQL Debugger/RPC" -Direction Inbound –Protocol TCP –LocalPort 135 -Action allow

#Enable SQL Analysis Ports

New-NetFirewallRule -DisplayName "SQL Analysis Services" -Direction Inbound –Protocol TCP –LocalPort 2383 -Action allow
New-NetFirewallRule -DisplayName "SQL Browser" -Direction Inbound –Protocol TCP –LocalPort 2382 -Action allow

#Enabling related Applications

New-NetFirewallRule -DisplayName "HTTP" -Direction Inbound –Protocol TCP –LocalPort 80 -Action allow
New-NetFirewallRule -DisplayName "SQL Server Browse Button Service" -Direction Inbound –Protocol UDP –LocalPort 1433 -Action allow
New-NetFirewallRule -DisplayName "SSL" -Direction Inbound –Protocol TCP –LocalPort 443 -Action allow

#Enable Windows Firewall
Set-NetFirewallProfile -DefaultInboundAction Block -DefaultOutboundAction Allow -NotifyOnListen True -AllowUnicastResponseToMulticast True

Write-Host "done!" -ForegroundColor Green

# start the SQL installer
Try
{
if (Test-Path $SQLsource){
 write-host "about to install SQL Server 2017..." -nonewline
$fileExe =  "$SQLsource\setup.exe"
$CONFIGURATIONFILE = "$folderpath\ConfigurationFile.ini"
& $fileExe  /CONFIGURATIONFILE=$CONFIGURATIONFILE
Write-Host "done!" -ForegroundColor Green
 } else {
write-host "Could not find the media for SQL Server 2017..."
break
}}
catch
{write-host "Something went wrong with the installation of SQL Server 2017, aborting."
break}

<#start the SQL Server 2017 CU5 downloader
$filepath="$folderpath\SQLServer2017-KB4092643-x64.exe"
if (!(Test-Path $filepath)){
write-host "Downloading SQL Server 2017 CU5..." -nonewline
$URL = "https://download.microsoft.com/download/C/4/F/C4F908C9-98ED-4E5F-88D5-7D6A5004AEBD/SQLServer2017-KB4092643-x64.exe"
$clnt = New-Object System.Net.WebClient
$clnt.DownloadFile($url,$filepath)
Write-Host "done!" -ForegroundColor Green
}
 else {
write-host "found the SQL Server 2017 CU5 Installer, no need to download it..."
}

# start the SQL Server 2017 CU5 installer
write-host "about to install SQL Server 2017 CU5..." -nonewline
$Parms = " /quiet /IAcceptSQLServerLicenseTerms /Action=Patch /AllInstances"
$Prms = $Parms.Split(" ")
& "$filepath" $Prms | Out-Null
Write-Host "done!" -ForegroundColor Green
#>

# start the SQL SSMS downloader
$filepath="$folderpath\SSMS-Setup-ENU.exe"
if (!(Test-Path $filepath)){
write-host "Downloading SQL Server 2017 SSMS..." -nonewline
$URL = "https://go.microsoft.com/fwlink/?linkid=870039"
$clnt = New-Object System.Net.WebClient
$clnt.DownloadFile($url,$filepath)
Write-Host "done!" -ForegroundColor Green
}
 else {
write-host "found the SQL SSMS Installer, no need to download it..."
}
# start the SQL SSMS installer
write-host "about to install SQL Server 2017 SSMS..." -nonewline
$Parms = " /Install /Quiet /Norestart /Logs SQLServerSSMSlog.txt"
$Prms = $Parms.Split(" ")
& "$filepath" $Prms | Out-Null

# Configure SQL memory (thanks Skatterbrainz)
#write-host "Configuring SQL memory..." -nonewline

<#
[System.Reflection.Assembly]::LoadWithPartialName('Microsoft.VisualBasic') | Out-Null
[System.Reflection.Assembly]::LoadWithPartialName('Microsoft.SqlServer.SMO') | Out-Null
$SQLMemory = New-Object ('Microsoft.SqlServer.Management.Smo.Server') ("(local)")
$SQLMemory.Configuration.MinServerMemory.ConfigValue = $SQLMemMin
$SQLMemory.Configuration.MaxServerMemory.ConfigValue = $SQLMemMax
$SQLMemory.Configuration.Alter()

#>
Building the Instance Type
Now that we have some of the ground work, let’s put the pieces together into an Instance Type. We will build the Instance Type, define our Layouts, and then associate a Node (template).
-
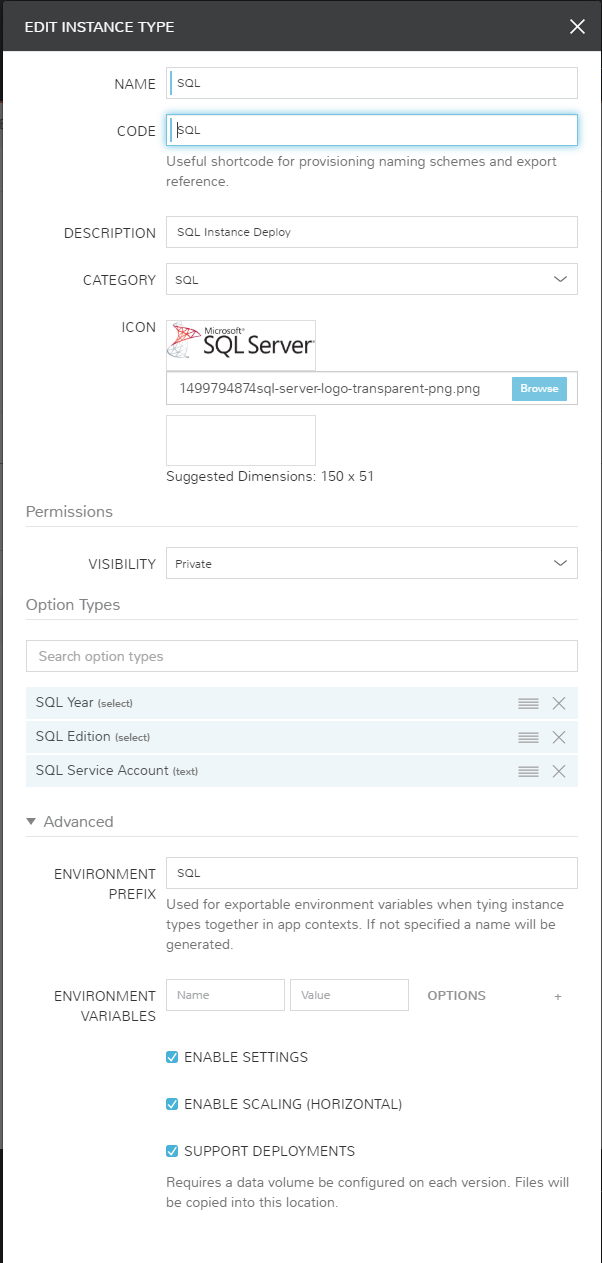
Create the Instance Type
From Provisioning > Library > Instance Types. Add new, and define the settings as shown. Ordering of the Option Types, controls how they are presented to the end user.
-
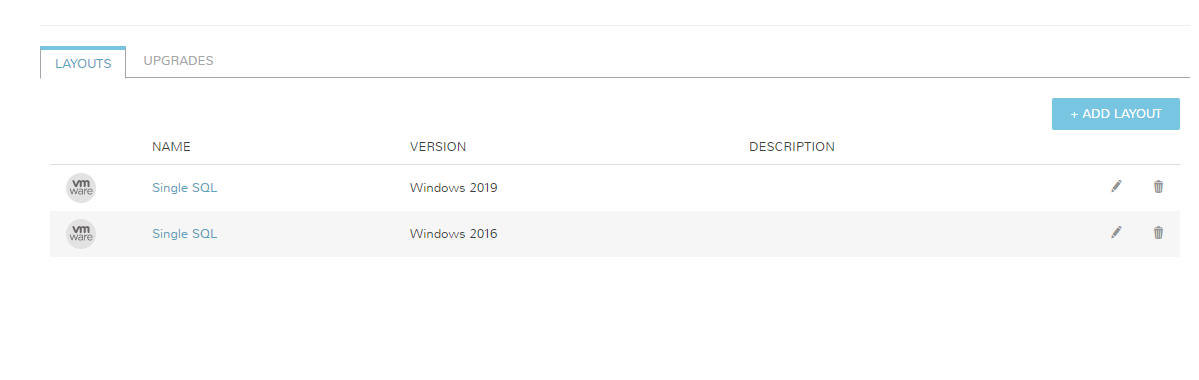
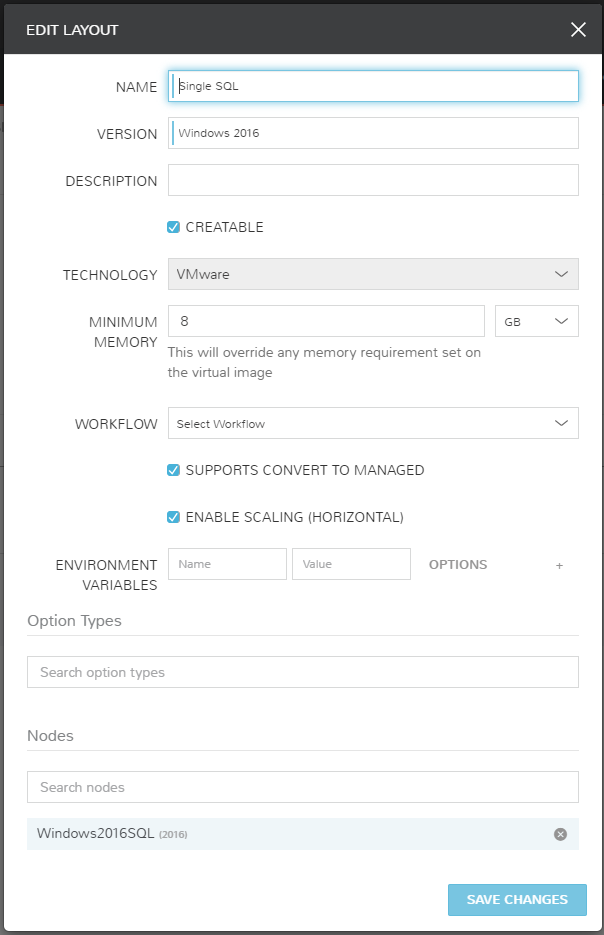
Assign the Layouts
Click into the Instance Type you have just created, and choose add Layout. Layouts are going to define the different deployment locations and setups the Instance Type builds. I.E – Clustered or Single SQL node on VMware or AWS.
-
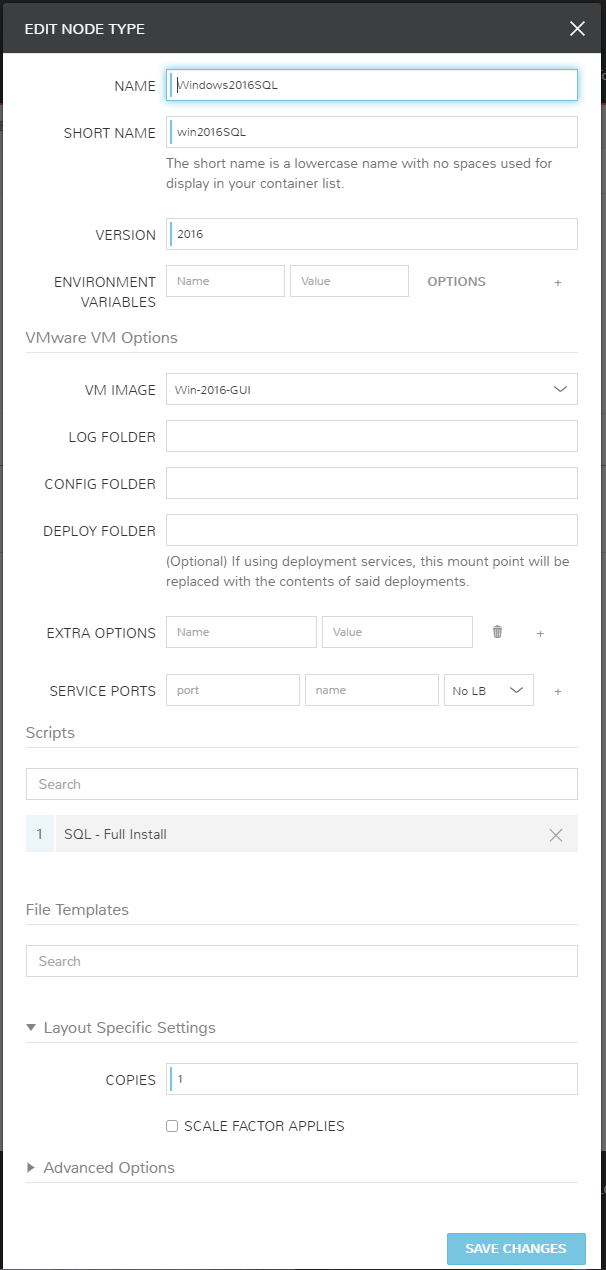
Assign a Node Type
Now navigate into the Layout you have defined. From here add a node type. This is the pointer to the backend template and scripts that will run specific to the template.
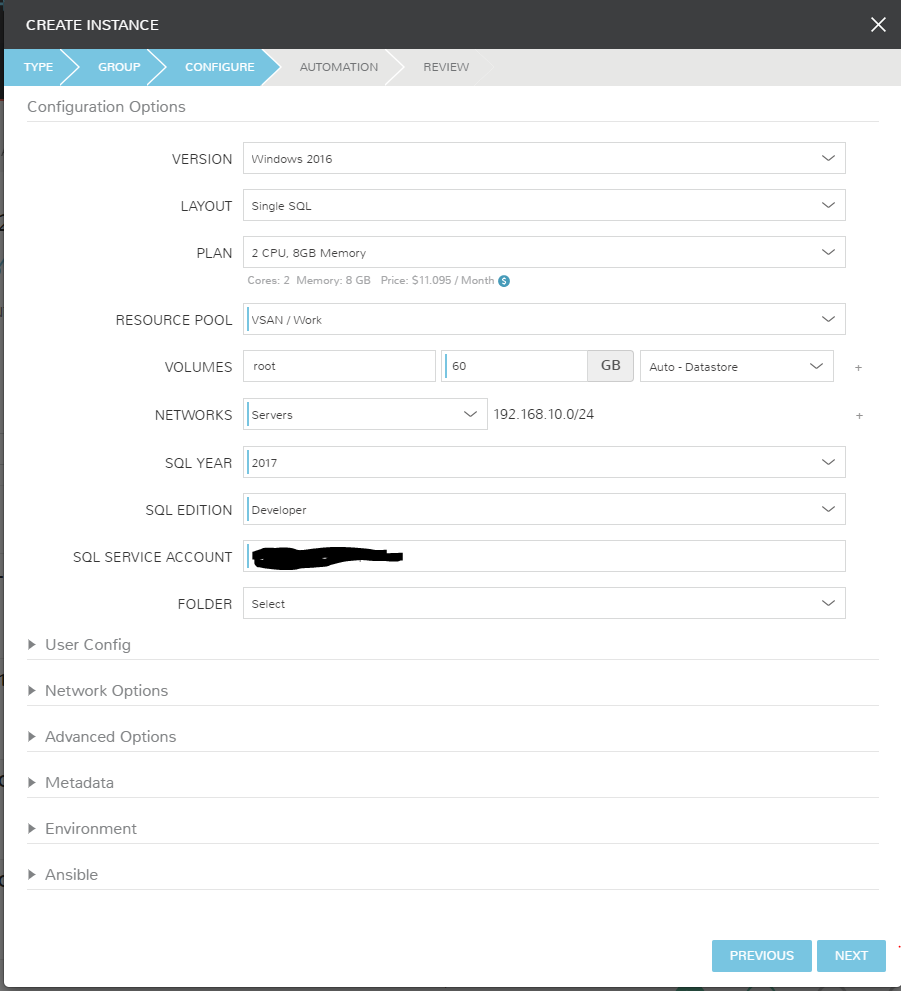
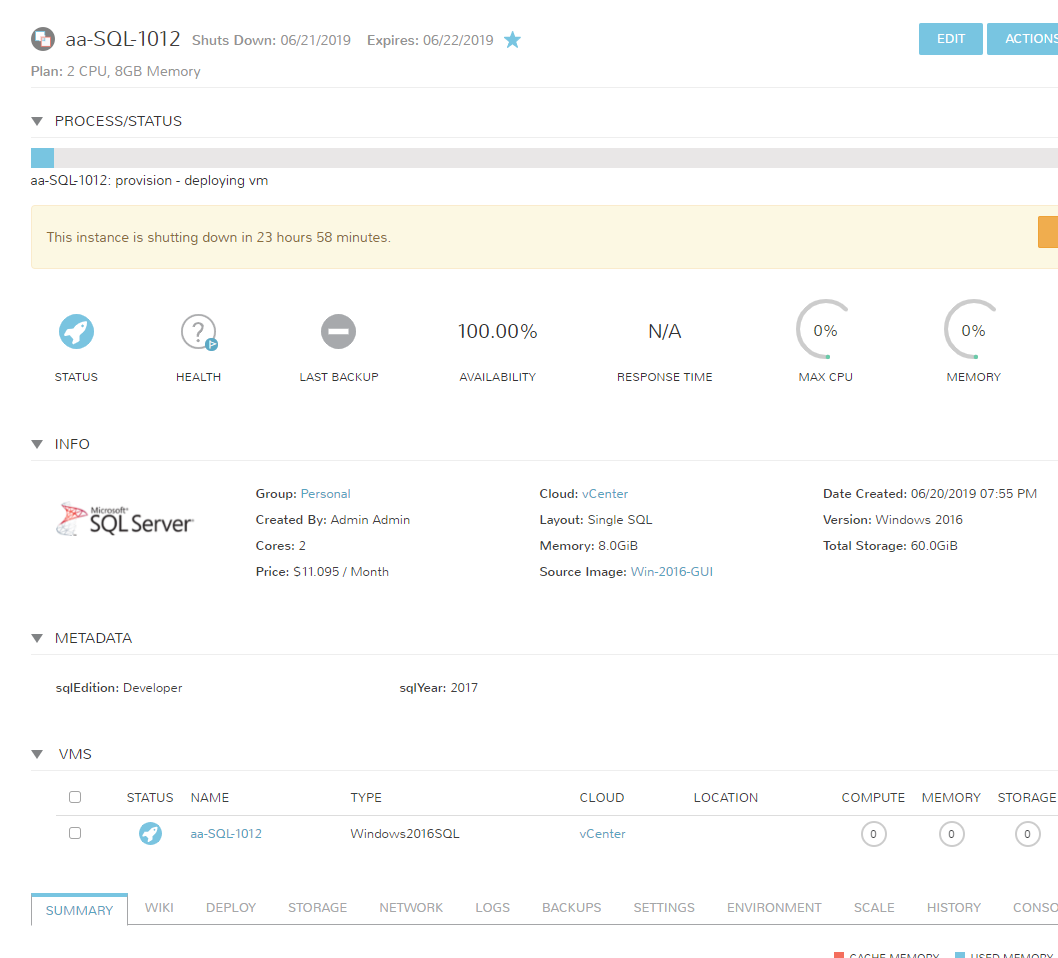
See it in Action!
Here are some shots of the request in action. As I have defined this as a single tiered SQL deploy, I will go to Provisioning > Instances to create this item.


Shane
says:Hey, where did you generate the .zip from? everything i see online is .exe or from an ISO
Chris Bunge
says:If you grab the exe and run it, it can create the offline installer files. I zipped the offline files.