

Welcome back for the third, and final installment of creating a WordPress server. In this part, I will be focusing on creating a WordPress server as a multi-tiered application. We will have the web front end, and I will be connecting to a MySQL database server. Because of the flexibility Morpheus Blueprints offer I can either create a new MySQL server, or I can consume an existing instance with a database. Note: For this example, I will create a new MySQL instance.
Lastly, anyone looking at a refresher on Part 1 or 2, check the following links:
Deploying WordPress on CentOS, Part 1: The Manual Method
Deploying WordPress on CentOS, Part 2: Let’s Inject Some Automation!
Let’s Begin!
I’m going to piggy back off of the instance type I create in part 2. There are some modifications to the code (as application requirements updated). I’ll post the latest scripts here. Remember these get created/modified under Provisioning > Library > Scripts:
Name: WordPress – Install WordPress
Script Type: Bash
Phase: Provision
setenforce 0

yum -y install http://rpms.remirepo.net/enterprise/remi-release-7.rpm
yum -y install epel-release yum-utils
yum-config-manager --enable remi-php73
yum -y install wget phpMyAdmin httpd mod_ssl php php-common php-mysql php-gd php-xml php-mbstring php-mcrypt

systemctl start httpd
systemctl enable httpd
firewall-cmd --add-service=http
firewall-cmd --add-service=https
firewall-cmd --runtime-to-permanent

wget http://wordpress.org/latest.tar.gz
tar xfz latest.tar.gz
cp -rf wordpress/* /var/www/html/
rm -rf wordpress
Name: MariaDB – Remote Configure Database
Script Type: Bash
Phase: Pre-Provision
RPass="<%=cypher.read('secret/mysql')%>"
WPDB="<%=customOptions.databaseName%>"
WPUser="<%=customOptions.databaseUser%>"
WPPass="<%=customOptions.databasePassword%>"
MYSQL_HOST="<%=evars.MYSQL_IP%>"
IP="<%=server.internalIp%>"

yum -y install sshpass

sshpass -p "$RPass" ssh -oStrictHostKeyChecking=no root@$MYSQL_HOST <<REMOTE
sudo mysql -u root -p$RPass -e "CREATE USER '$WPUser'@'$IP' IDENTIFIED BY '$WPPass';"
sudo mysql -u root -p$RPass -e "CREATE DATABASE $WPDB;"
sudo mysql -u root -p$RPass -e "GRANT ALL ON $WPDB.* TO $WPUser@'$IP' IDENTIFIED BY '$WPPass';"
sudo mysql -u root -p$RPass -e "FLUSH PRIVILEGES;"
REMOTE
Name: MariaDB – Install MySQL
Script Type: Bash
Phase: Pre-Provision
RPass="<%=cypher.read('secret/mysql')%>"
WPDB="<%=customOptions.databaseName%>"
WPUser="<%=customOptions.databaseUser%>"
WPPass="<%=customOptions.databasePassword%>"

yum -y install epel-release yum-utils
yum -y install mariadb mariadb-server

systemctl start mariadb
systemctl enable mariadb
firewall-cmd --add-service=mysql
firewall-cmd --runtime-to-permanent

sudo mysql -u root -e "UPDATE mysql.user SET Password=PASSWORD('$RPass') WHERE User='root';"
sudo mysql -u root -e "flush privileges"
sudo mysql -u root -p$RPass -e "DELETE FROM mysql.user WHERE User='';"
sudo mysql -u root -p$RPass -e "DELETE FROM mysql.user WHERE User='root' AND Host NOT IN ('localhost', '127.0.0.1', '::1');"
sudo mysql -u root -p$RPass -e "DROP DATABASE IF EXISTS test;"
sudo mysql -u root -p$RPass -e "DELETE FROM mysql.db WHERE Db='test' OR Db='test\_%';"
sudo mysql -u root -p$RPass -e "FLUSH PRIVILEGES;"
Now that we have those updated/created let’s ensure we have all of the option types we need for a multi-tiered platform. These get created under Provisioning > Library > Option Types. We are reusing the same Option Types we created in Part 2. These are:
Database Name
Database User
Database Password
Website URL
Great! Now that we have the ground work completed, let’s create the multi-tiered layouts (different provisioning flavors/styles per instance type) on our WordPress and MySQL instance types.
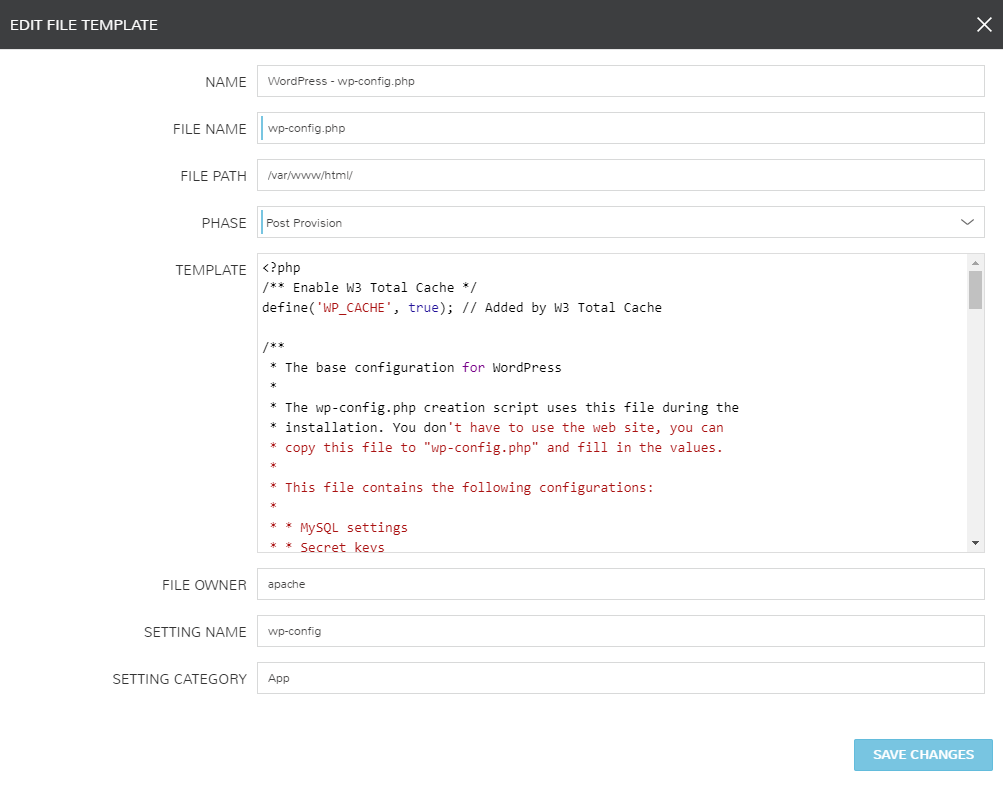
And here are the File Templates required to make this magic happen. A reminder File Templates are files we can place on servers that interpret Morpheus variables. We are using these to configure the database connection settings in the WordPress configuration files.
<?php
/** Enable W3 Total Cache */
define('WP_CACHE', true); // Added by W3 Total Cache

/**
 * The base configuration for WordPress
 *
 * The wp-config.php creation script uses this file during the
 * installation. You don't have to use the web site, you can
 * copy this file to "wp-config.php" and fill in the values.
 *
 * This file contains the following configurations:
 *
 * * MySQL settings
 * * Secret keys
 * * Database table prefix
 * * ABSPATH
 *
 * @link https://codex.wordpress.org/Editing_wp-config.php
 *
 * @package WordPress
 */

// ** MySQL settings - You can get this info from your web host ** //
/** The name of the database for WordPress */
define('DB_NAME', '<%=customOptions.databaseName%>');

/** MySQL database username */
define('DB_USER', '<%=customOptions.databaseUser%>');

/** MySQL database password */
define('DB_PASSWORD', '<%=customOptions.databasePassword%>');

/** MySQL hostname */
define('DB_HOST', '<%=evars.MYSQL_IP%>');

/** Database Charset to use in creating database tables. */
define('DB_CHARSET', 'utf8');

/** The Database Collate type. Don't change this if in doubt. */
define('DB_COLLATE', '');


/** FTP Connection */
define('FS_METHOD','direct');
define("FTP_HOST","localhost");
define("FTP_USER",'<%=customOptions.databaseUser%>');
define("FTP_PASS",'<%=customOptions.databasePassword%>');


/**#@+
 * Authentication Unique Keys and Salts.
 *
 * Change these to different unique phrases!
 * You can generate these using the {@link https://api.wordpress.org/secret-key/1.1/salt/ WordPress.org secret-key service}
 * You can change these at any point in time to invalidate all existing cookies. This will force all users to have to log in again.
 *
 * @since 2.6.0
 */
define('AUTH_KEY',         'put your unique phrase here');
define('SECURE_AUTH_KEY',  'put your unique phrase here');
define('LOGGED_IN_KEY',    'put your unique phrase here');
define('NONCE_KEY',        'put your unique phrase here');
define('AUTH_SALT',        'put your unique phrase here');
define('SECURE_AUTH_SALT', 'put your unique phrase here');
define('LOGGED_IN_SALT',   'put your unique phrase here');
define('NONCE_SALT',       'put your unique phrase here');

/**#@-*/

/**
 * WordPress Database Table prefix.
 *
 * You can have multiple installations in one database if you give each
 * a unique prefix. Only numbers, letters, and underscores please!
 */
$table_prefix  = 'wp_';

/**
 * For developers: WordPress debugging mode.
 *
 * Change this to true to enable the display of notices during development.
 * It is strongly recommended that plugin and theme developers use WP_DEBUG
 * in their development environments.
 *
 * For information on other constants that can be used for debugging,
 * visit the Codex.
 *
 * @link https://codex.wordpress.org/Debugging_in_WordPress
 */
define('WP_DEBUG', false);

define('FORCE_SSL_ADMIN', true);

/* That's all, stop editing! Happy blogging. */

/** Absolute path to the WordPress directory. */
if ( !defined('ABSPATH') )
	define('ABSPATH', dirname(__FILE__) . '/');

/** Sets up WordPress vars and included files. */
require_once(ABSPATH . 'wp-settings.php');
# BEGIN WordPress
<IfModule mod_rewrite.c>
RewriteEngine On
RewriteBase /
RewriteRule ^index\.php$ - [L]
RewriteCond %{REQUEST_FILENAME} !-f
RewriteCond %{REQUEST_FILENAME} !-d
RewriteRule . /index.php [L]
</IfModule>

# END WordPress

# Redirect IP
RewriteCond %{HTTP_HOST} ^<%=server.externalIp%>
RewriteRule ^(.*)$ https://<%=customOptions.websiteUrl%>/$1 [R=301,L]


# Redirect to www
RewriteCond %{HTTP_HOST} !^www\. [NC]
RewriteRule ^(.*)$ https://<%=customOptions.websiteUrl%>/$1 [R=301,L]

# Redirect to HTTPS
RewriteCond %{HTTPS} off
RewriteRule ^(.*)$ https://<%=customOptions.websiteUrl%>/$1 [R=301,L]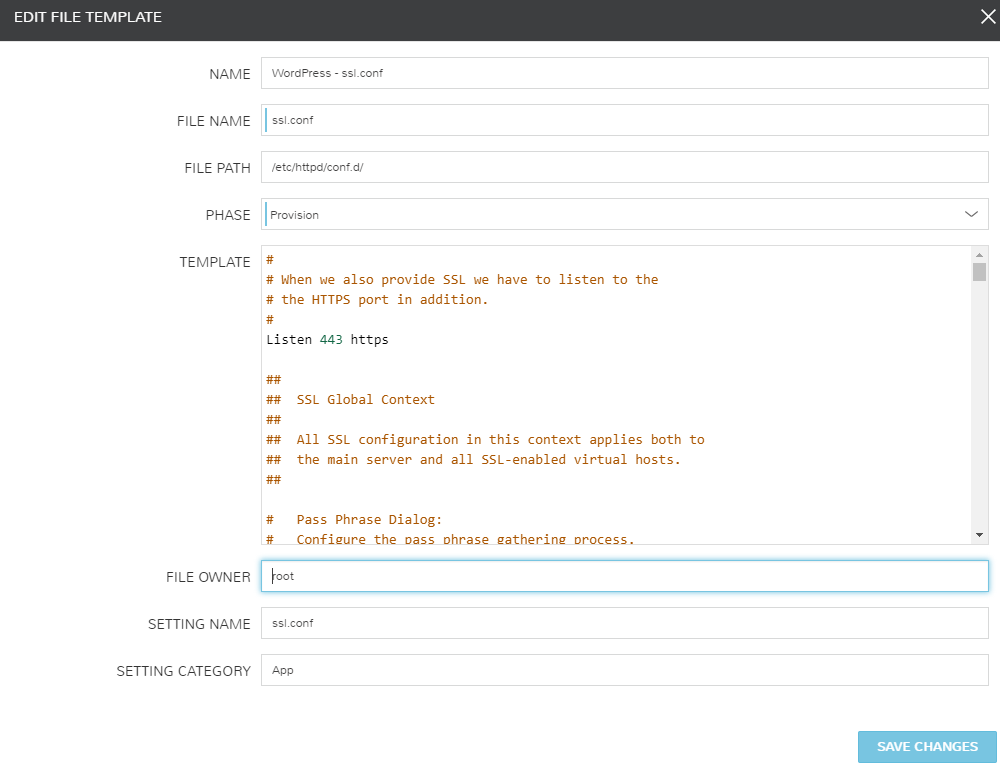
#
# When we also provide SSL we have to listen to the
# the HTTPS port in addition.
#
Listen 443 https

##
##  SSL Global Context
##
##  All SSL configuration in this context applies both to
##  the main server and all SSL-enabled virtual hosts.
##

#   Pass Phrase Dialog:
#   Configure the pass phrase gathering process.
#   The filtering dialog program (`builtin' is a internal
#   terminal dialog) has to provide the pass phrase on stdout.
SSLPassPhraseDialog exec:/usr/libexec/httpd-ssl-pass-dialog

#   Inter-Process Session Cache:
#   Configure the SSL Session Cache: First the mechanism
#   to use and second the expiring timeout (in seconds).
SSLSessionCache         shmcb:/run/httpd/sslcache(512000)
SSLSessionCacheTimeout  300

#   Pseudo Random Number Generator (PRNG):
#   Configure one or more sources to seed the PRNG of the
#   SSL library. The seed data should be of good random quality.
#   WARNING! On some platforms /dev/random blocks if not enough entropy
#   is available. This means you then cannot use the /dev/random device
#   because it would lead to very long connection times (as long as
#   it requires to make more entropy available). But usually those
#   platforms additionally provide a /dev/urandom device which doesn't
#   block. So, if available, use this one instead. Read the mod_ssl User
#   Manual for more details.
SSLRandomSeed startup file:/dev/urandom  256
SSLRandomSeed connect builtin
#SSLRandomSeed startup file:/dev/random  512
#SSLRandomSeed connect file:/dev/random  512
#SSLRandomSeed connect file:/dev/urandom 512

#
# Use "SSLCryptoDevice" to enable any supported hardware
# accelerators. Use "openssl engine -v" to list supported
# engine names.  NOTE: If you enable an accelerator and the
# server does not start, consult the error logs and ensure
# your accelerator is functioning properly.
#
SSLCryptoDevice builtin
#SSLCryptoDevice ubsec

##
## SSL Virtual Host Context
##

<VirtualHost _default_:443>

# General setup for the virtual host, inherited from global configuration
#DocumentRoot "/var/www/html"
#ServerName www.example.com:443

# Use separate log files for the SSL virtual host; note that LogLevel
# is not inherited from httpd.conf.
ErrorLog logs/ssl_error_log
TransferLog logs/ssl_access_log
LogLevel warn

#   SSL Engine Switch:
#   Enable/Disable SSL for this virtual host.
SSLEngine on

#   SSL Protocol support:
# List the enable protocol levels with which clients will be able to
# connect.  Disable SSLv2 access by default:
SSLProtocol all -SSLv2 -SSLv3

#   SSL Cipher Suite:
#   List the ciphers that the client is permitted to negotiate.
#   See the mod_ssl documentation for a complete list.
SSLCipherSuite HIGH:3DES:!aNULL:!MD5:!SEED:!IDEA

#   Speed-optimized SSL Cipher configuration:
#   If speed is your main concern (on busy HTTPS servers e.g.),
#   you might want to force clients to specific, performance
#   optimized ciphers. In this case, prepend those ciphers
#   to the SSLCipherSuite list, and enable SSLHonorCipherOrder.
#   Caveat: by giving precedence to RC4-SHA and AES128-SHA
#   (as in the example below), most connections will no longer
#   have perfect forward secrecy - if the server's key is
#   compromised, captures of past or future traffic must be
#   considered compromised, too.
#SSLCipherSuite RC4-SHA:AES128-SHA:HIGH:MEDIUM:!aNULL:!MD5
#SSLHonorCipherOrder on

#   Server Certificate:
# Point SSLCertificateFile at a PEM encoded certificate.  If
# the certificate is encrypted, then you will be prompted for a
# pass phrase.  Note that a kill -HUP will prompt again.  A new
# certificate can be generated using the genkey(1) command.
SSLCertificateFile /etc/letsencrypt/live/<%=customOptions.websiteUrl%>/cert.pem

#   Server Private Key:
#   If the key is not combined with the certificate, use this
#   directive to point at the key file.  Keep in mind that if
#   you've both a RSA and a DSA private key you can configure
#   both in parallel (to also allow the use of DSA ciphers, etc.)
SSLCertificateKeyFile /etc/letsencrypt/live/<%=customOptions.websiteUrl%>/privkey.pem

#   Server Certificate Chain:
#   Point SSLCertificateChainFile at a file containing the
#   concatenation of PEM encoded CA certificates which form the
#   certificate chain for the server certificate. Alternatively
#   the referenced file can be the same as SSLCertificateFile
#   when the CA certificates are directly appended to the server
#   certificate for convinience.
SSLCertificateChainFile /etc/letsencrypt/live/<%=customOptions.websiteUrl%>/fullchain.pem

#   Certificate Authority (CA):
#   Set the CA certificate verification path where to find CA
#   certificates for client authentication or alternatively one
#   huge file containing all of them (file must be PEM encoded)
#SSLCACertificateFile /etc/pki/tls/certs/ca-bundle.crt

#   Client Authentication (Type):
#   Client certificate verification type and depth.  Types are
#   none, optional, require and optional_no_ca.  Depth is a
#   number which specifies how deeply to verify the certificate
#   issuer chain before deciding the certificate is not valid.
#SSLVerifyClient require
#SSLVerifyDepth  10

#   Access Control:
#   With SSLRequire you can do per-directory access control based
#   on arbitrary complex boolean expressions containing server
#   variable checks and other lookup directives.  The syntax is a
#   mixture between C and Perl.  See the mod_ssl documentation
#   for more details.
#<Location />
#SSLRequire (    %{SSL_CIPHER} !~ m/^(EXP|NULL)/ \
#            and %{SSL_CLIENT_S_DN_O} eq "Snake Oil, Ltd." \
#            and %{SSL_CLIENT_S_DN_OU} in {"Staff", "CA", "Dev"} \
#            and %{TIME_WDAY} >= 1 and %{TIME_WDAY} <= 5 \
#            and %{TIME_HOUR} >= 8 and %{TIME_HOUR} <= 20       ) \
#           or %{REMOTE_ADDR} =~ m/^192\.76\.162\.[0-9]+$/
#</Location>

#   SSL Engine Options:
#   Set various options for the SSL engine.
#   o FakeBasicAuth:
#     Translate the client X.509 into a Basic Authorisation.  This means that
#     the standard Auth/DBMAuth methods can be used for access control.  The
#     user name is the `one line' version of the client's X.509 certificate.
#     Note that no password is obtained from the user. Every entry in the user
#     file needs this password: `xxj31ZMTZzkVA'.
#   o ExportCertData:
#     This exports two additional environment variables: SSL_CLIENT_CERT and
#     SSL_SERVER_CERT. These contain the PEM-encoded certificates of the
#     server (always existing) and the client (only existing when client
#     authentication is used). This can be used to import the certificates
#     into CGI scripts.
#   o StdEnvVars:
#     This exports the standard SSL/TLS related `SSL_*' environment variables.
#     Per default this exportation is switched off for performance reasons,
#     because the extraction step is an expensive operation and is usually
#     useless for serving static content. So one usually enables the
#     exportation for CGI and SSI requests only.
#   o StrictRequire:
#     This denies access when "SSLRequireSSL" or "SSLRequire" applied even
#     under a "Satisfy any" situation, i.e. when it applies access is denied
#     and no other module can change it.
#   o OptRenegotiate:
#     This enables optimized SSL connection renegotiation handling when SSL
#     directives are used in per-directory context.
#SSLOptions +FakeBasicAuth +ExportCertData +StrictRequire
<Files ~ "\.(cgi|shtml|phtml|php3?)$">
    SSLOptions +StdEnvVars
</Files>
<Directory "/var/www/cgi-bin">
    SSLOptions +StdEnvVars
</Directory>

#   SSL Protocol Adjustments:
#   The safe and default but still SSL/TLS standard compliant shutdown
#   approach is that mod_ssl sends the close notify alert but doesn't wait for
#   the close notify alert from client. When you need a different shutdown
#   approach you can use one of the following variables:
#   o ssl-unclean-shutdown:
#     This forces an unclean shutdown when the connection is closed, i.e. no
#     SSL close notify alert is send or allowed to received.  This violates
#     the SSL/TLS standard but is needed for some brain-dead browsers. Use
#     this when you receive I/O errors because of the standard approach where
#     mod_ssl sends the close notify alert.
#   o ssl-accurate-shutdown:
#     This forces an accurate shutdown when the connection is closed, i.e. a
#     SSL close notify alert is send and mod_ssl waits for the close notify
#     alert of the client. This is 100% SSL/TLS standard compliant, but in
#     practice often causes hanging connections with brain-dead browsers. Use
#     this only for browsers where you know that their SSL implementation
#     works correctly.
#   Notice: Most problems of broken clients are also related to the HTTP
#   keep-alive facility, so you usually additionally want to disable
#   keep-alive for those clients, too. Use variable "nokeepalive" for this.
#   Similarly, one has to force some clients to use HTTP/1.0 to workaround
#   their broken HTTP/1.1 implementation. Use variables "downgrade-1.0" and
#   "force-response-1.0" for this.
BrowserMatch "MSIE [2-5]" \
         nokeepalive ssl-unclean-shutdown \
         downgrade-1.0 force-response-1.0

#   Per-Server Logging:
#   The home of a custom SSL log file. Use this when you want a
#   compact non-error SSL logfile on a virtual host basis.
CustomLog logs/ssl_request_log \
          "%t %h %{SSL_PROTOCOL}x %{SSL_CIPHER}x \"%r\" %b"

</VirtualHost>
Instance Type Layouts
Ok, now it’s time to create our consumable instance types. Again, we will reuse the WordPress Instance Type, by simply creating a new layout. We will also need to create a new MySQL Instance Type so we can define our database tier.
-
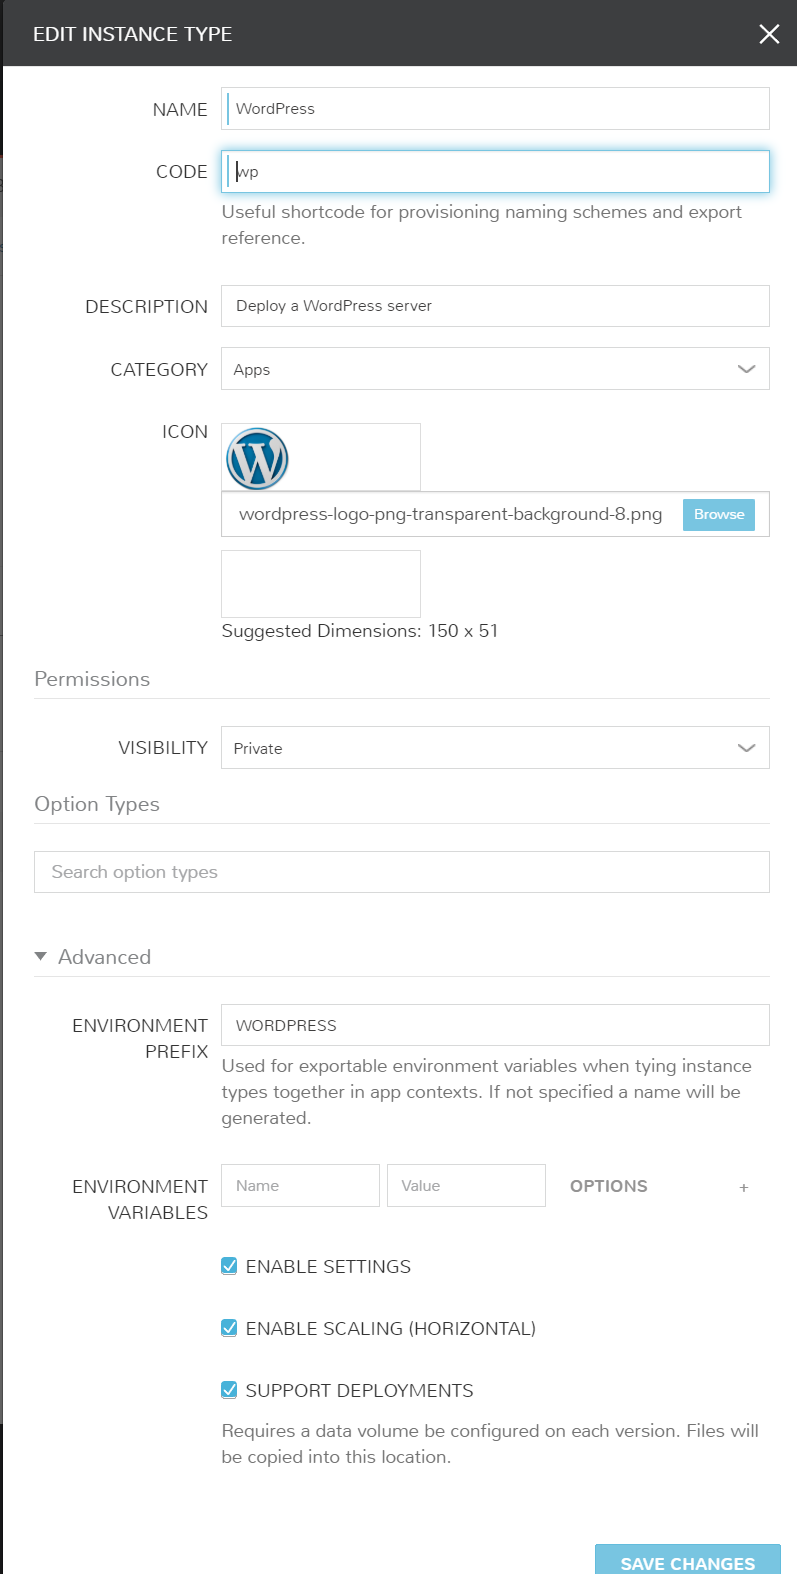
Create/Modify WordPress Instance Type
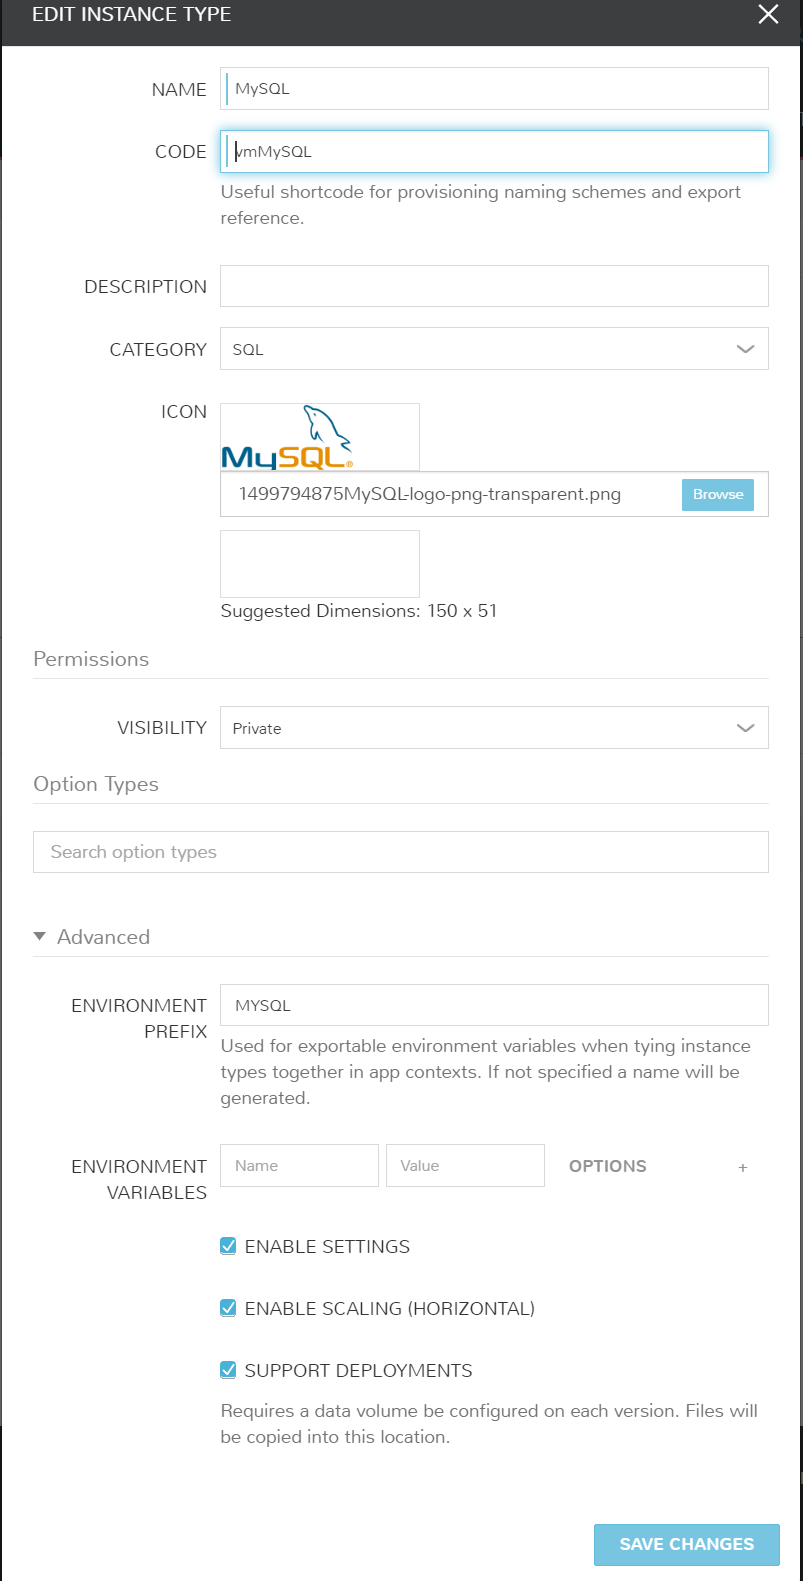
Modifying/Creating a new Instance Type is a similar process. If you have not created your WordPress instance type, you’ll still be able to follow the information below to create one now!
Start by navigating to Provisioning > Library > Instance Types and add new. Create with the following settings.
-
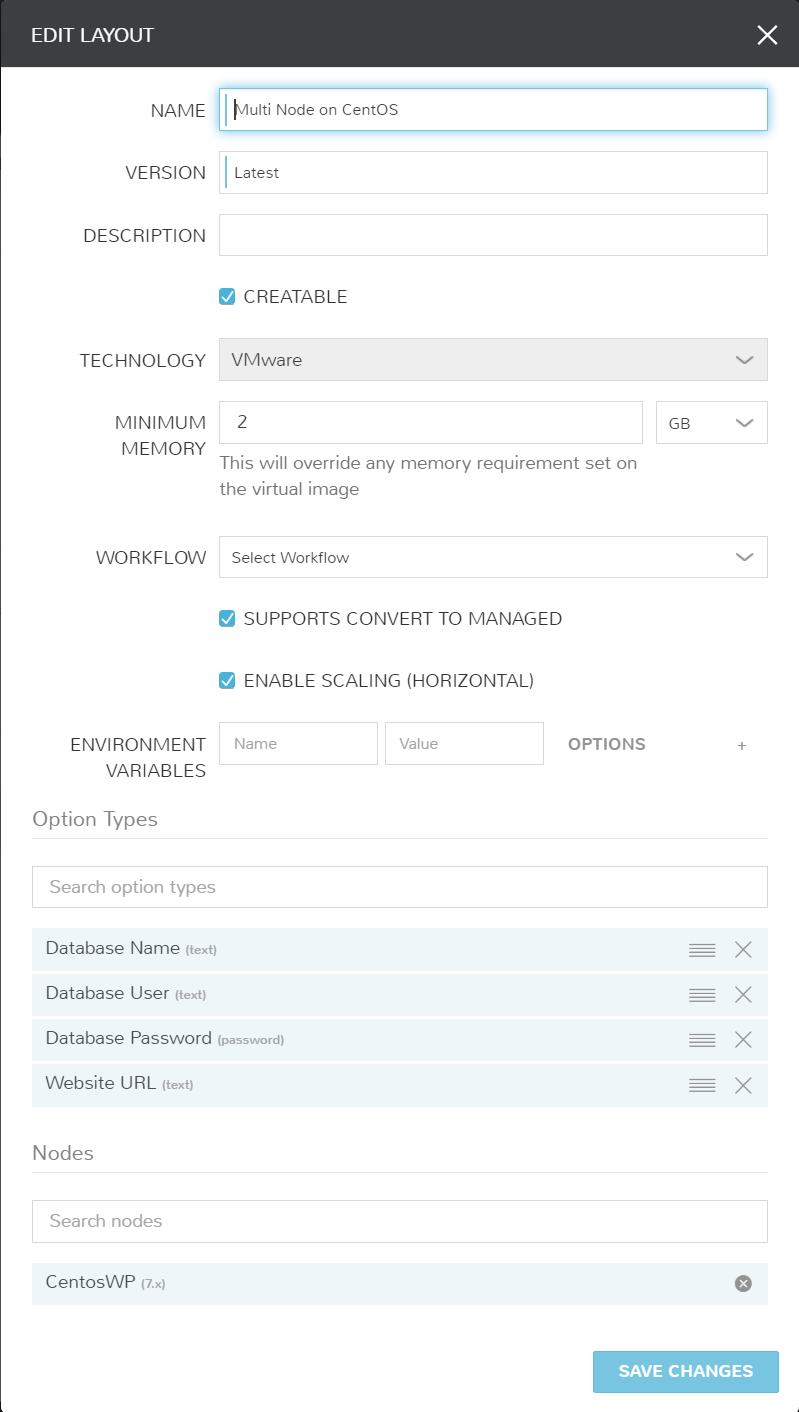
Create Multi-Tier Layout
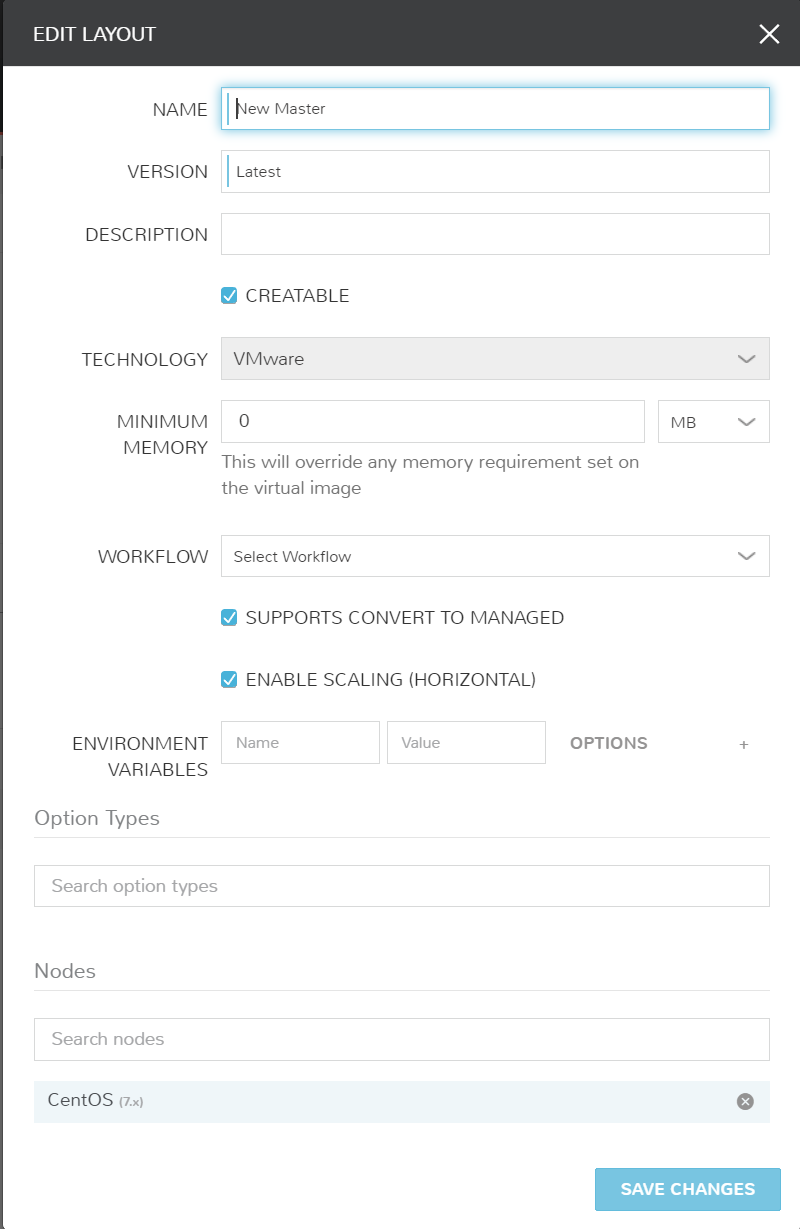
Now we’re going to make a specific layout to handle the alternate scriptss for multi-tiered deployments. The advantage to layouts is having a single Instance Type (Catalog Item) that can have several different configurations within. Create the layout by clicking “Add Layout” and configure the following.
-
Associate Node to Layout
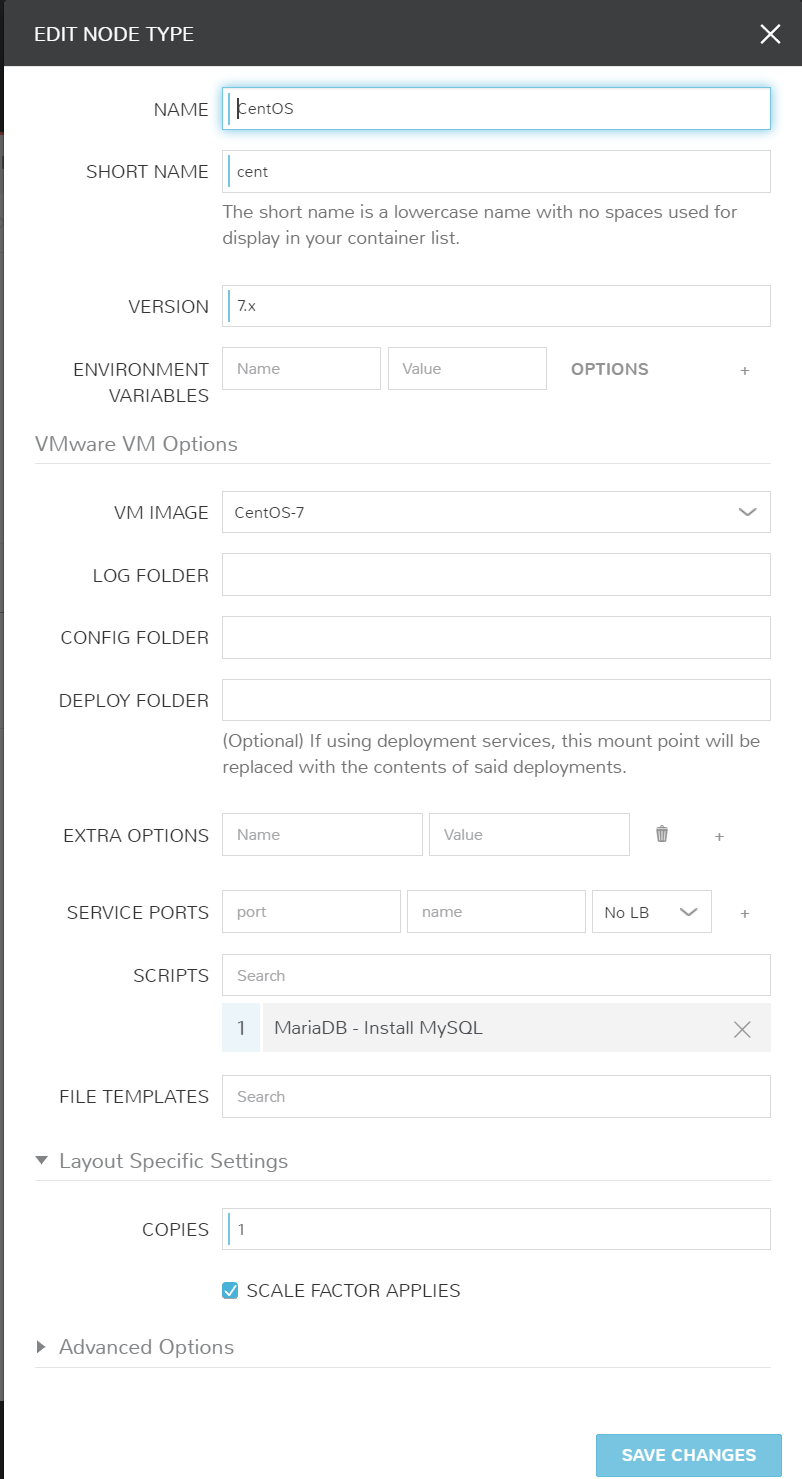
The final step to creating the WordPress Multi-Tiered Layout is associating a Node (this will handle the individual scripts this tier needs). Click “Add VM Type” and fill out accordingly.

-
Repeat with MySQL
We’ll follow the same 3 steps for a MySQL database Instance Type. Repeat the first 3 steps with the following configurations for MySQL.
Make that a Blueprint!
A key value to Morpheus is the application based approach. Morpheus deploys a single VM/container or a single tier of an application with multiple VMs/containers as an instance. So in other words, we treat an instance as the top level to a VM or container.
With Blueprints/Applications, we treat that an Application as the top level to multiple instances. That’s exactly why we created the MySQL and WordPress instance types. Let’s go ahead and piece these together in a Blueprint. Also note, these can be easily created and modified via JSON or YAML if you would like to automate these Blueprint builds.
-
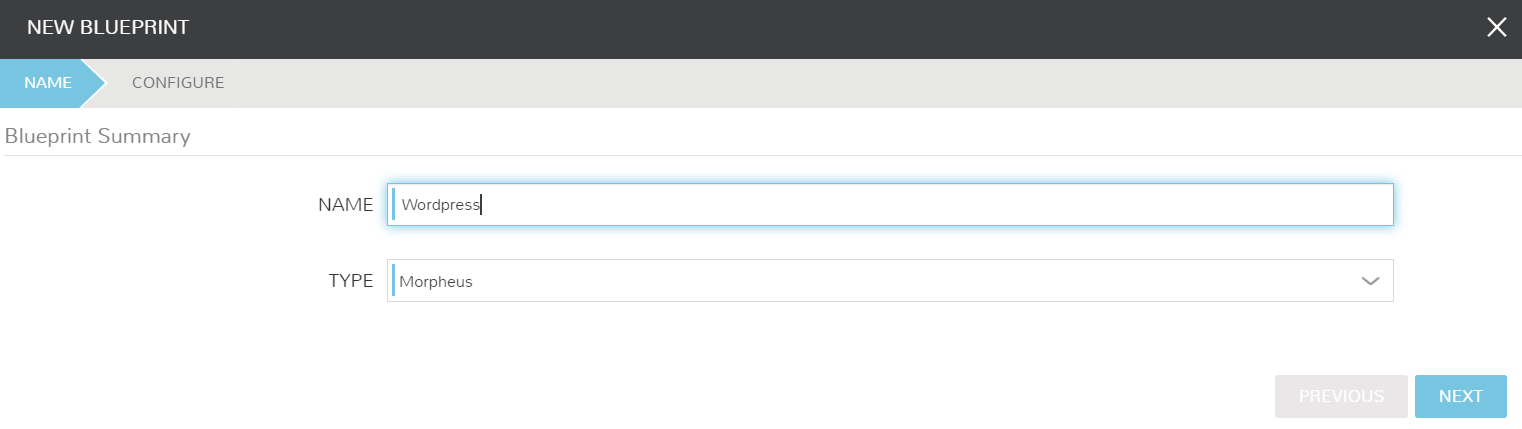
Create Blueprint
Navigate to Provisioning > Blueprints. From here we will create a new Blueprint with the type “Morpheus”. Other format types supported are Terraform, Cloudformation, ARM, and soon more!
-
Map Instances in BluePrint
Once the Blueprint creation window is open, we’re going to map our tiers and Instance Types. Note key settings like the boot ordering.
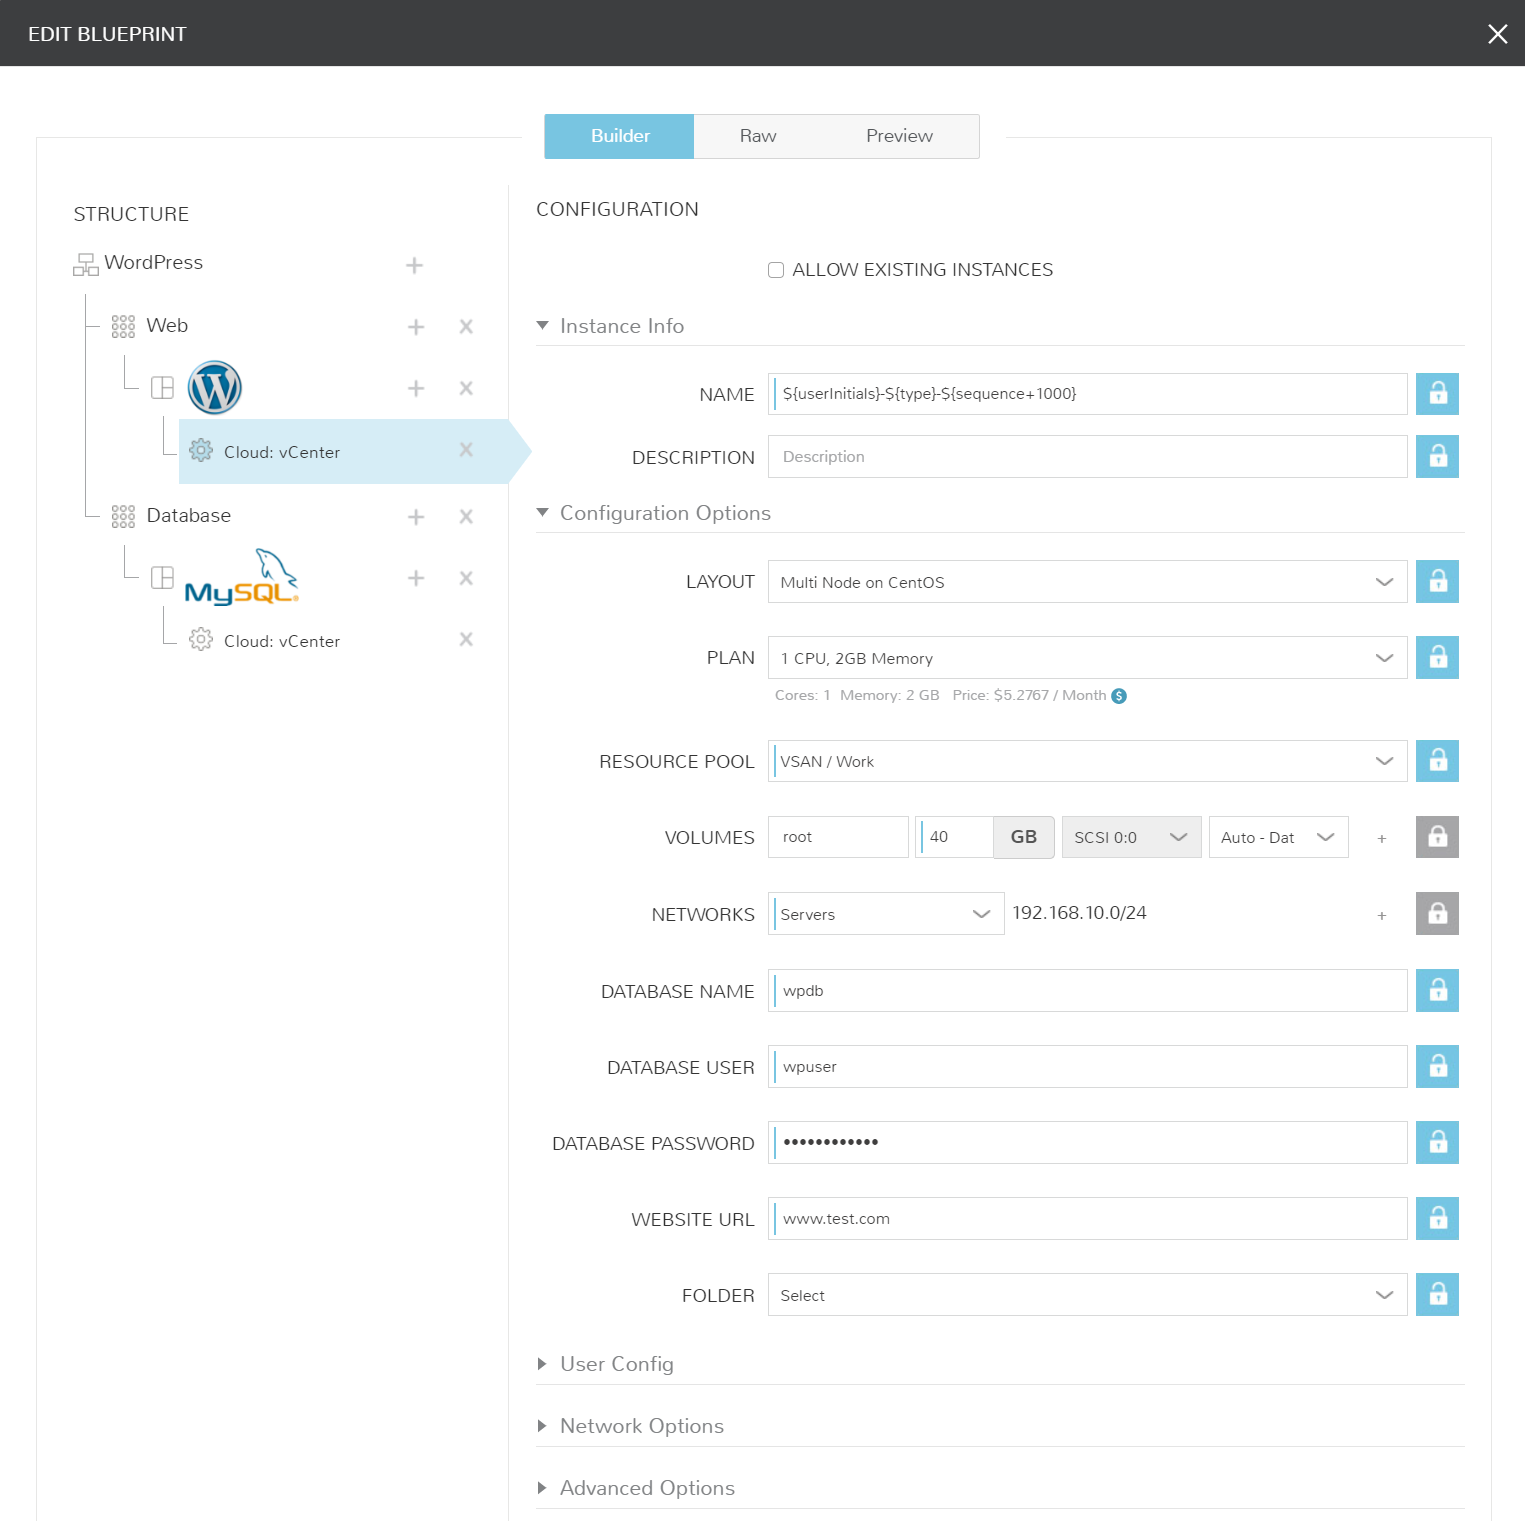
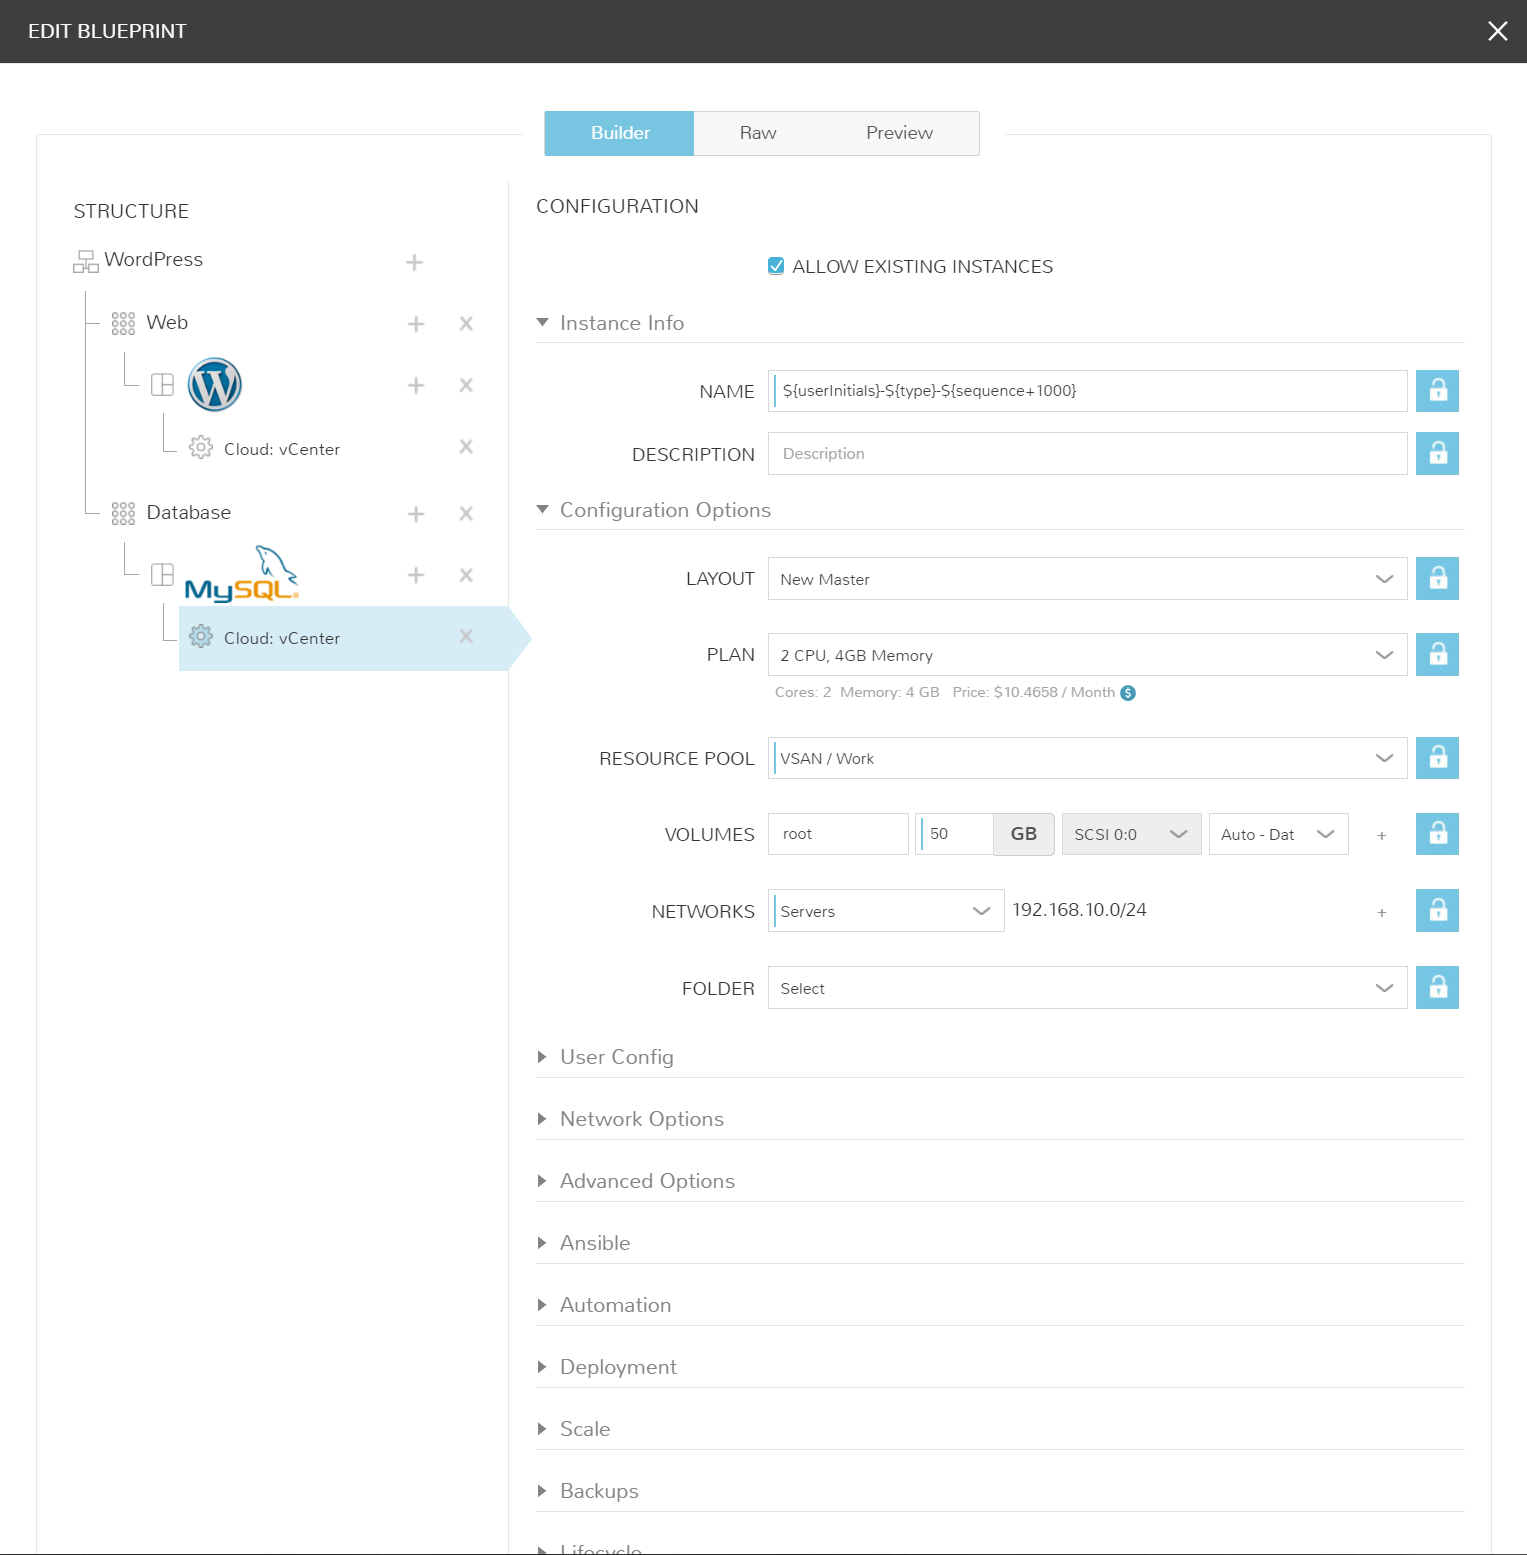
I’ve added my Blueprint JSON export as well. Some of these items are specific to my environment, but allow you to understand how Morpheus can be built or maintained via code.
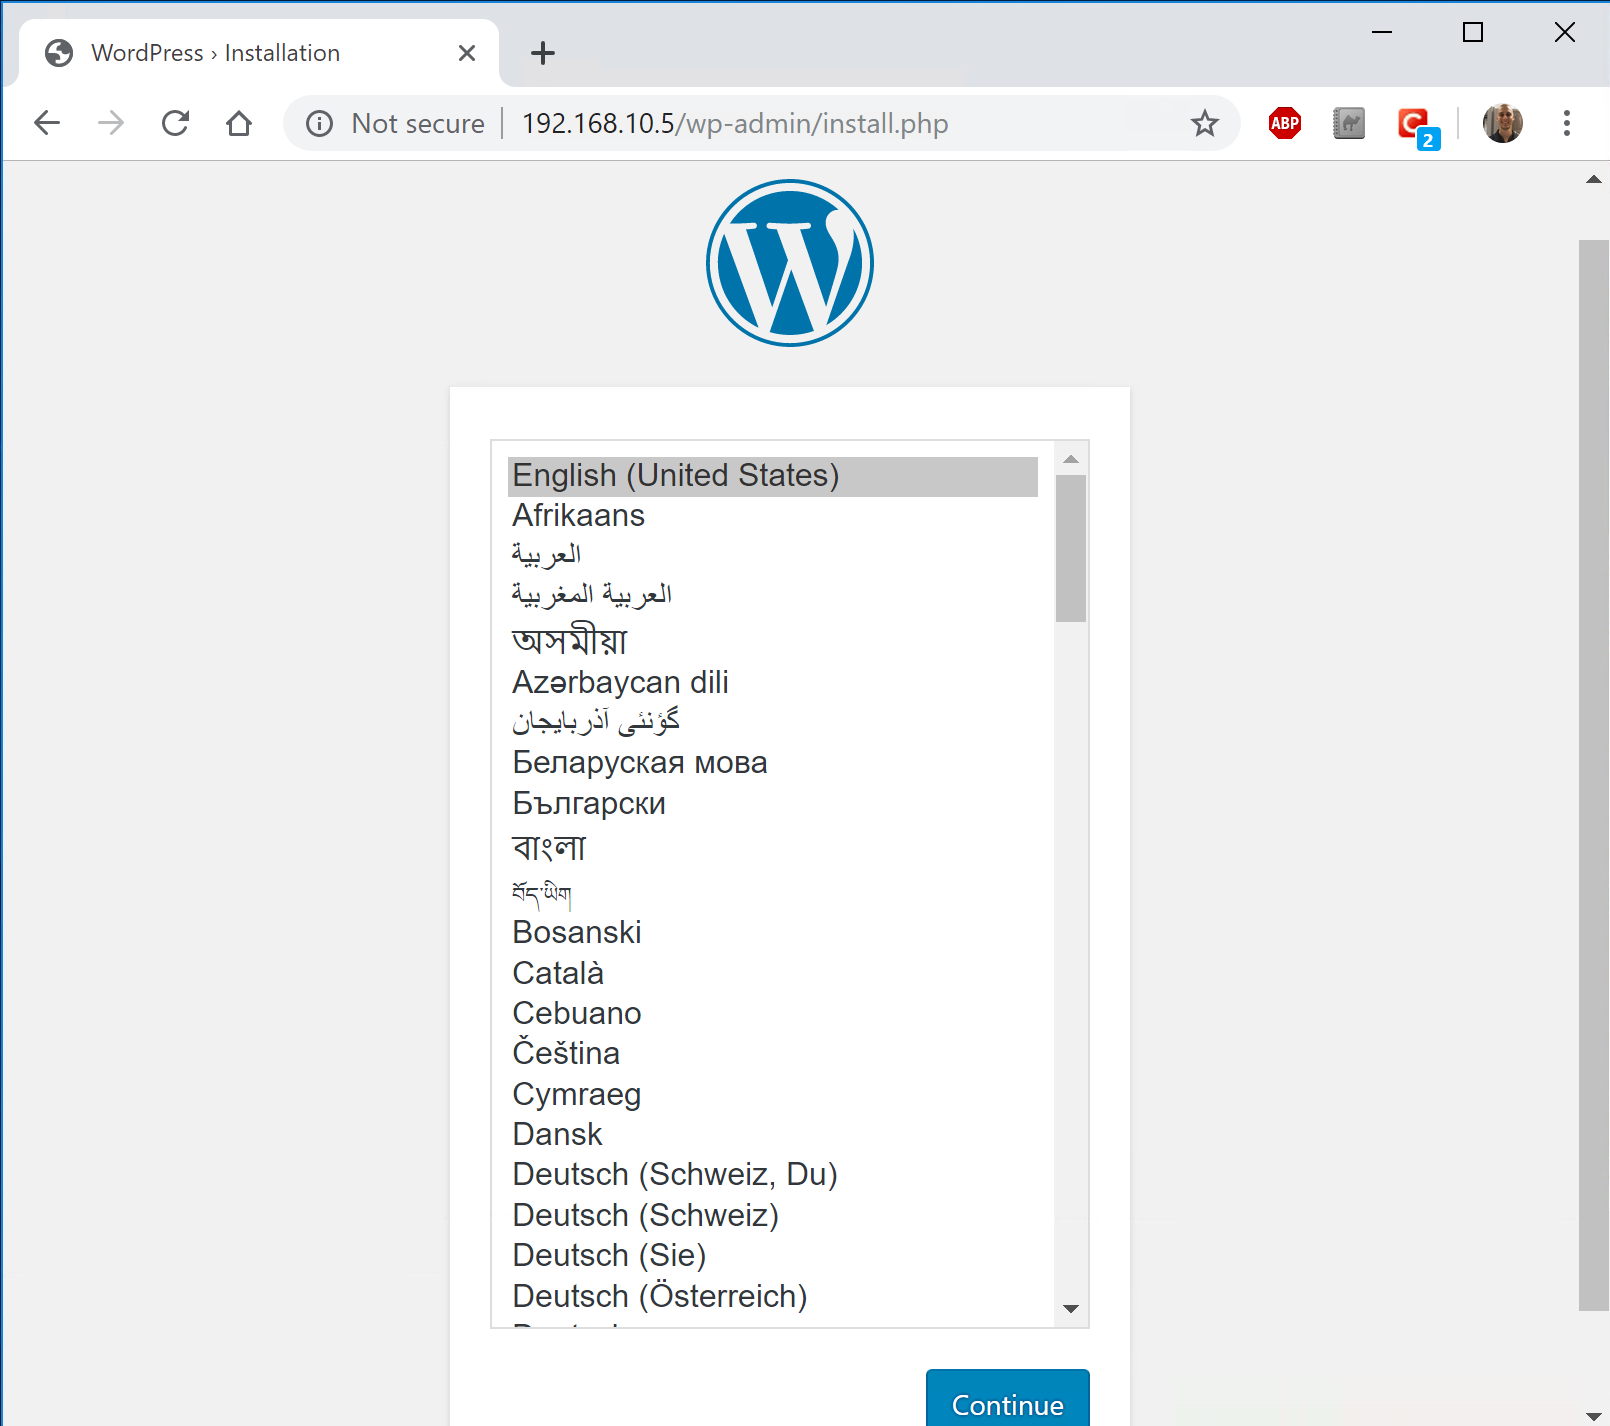
Host your own PaaS. See it in Action!
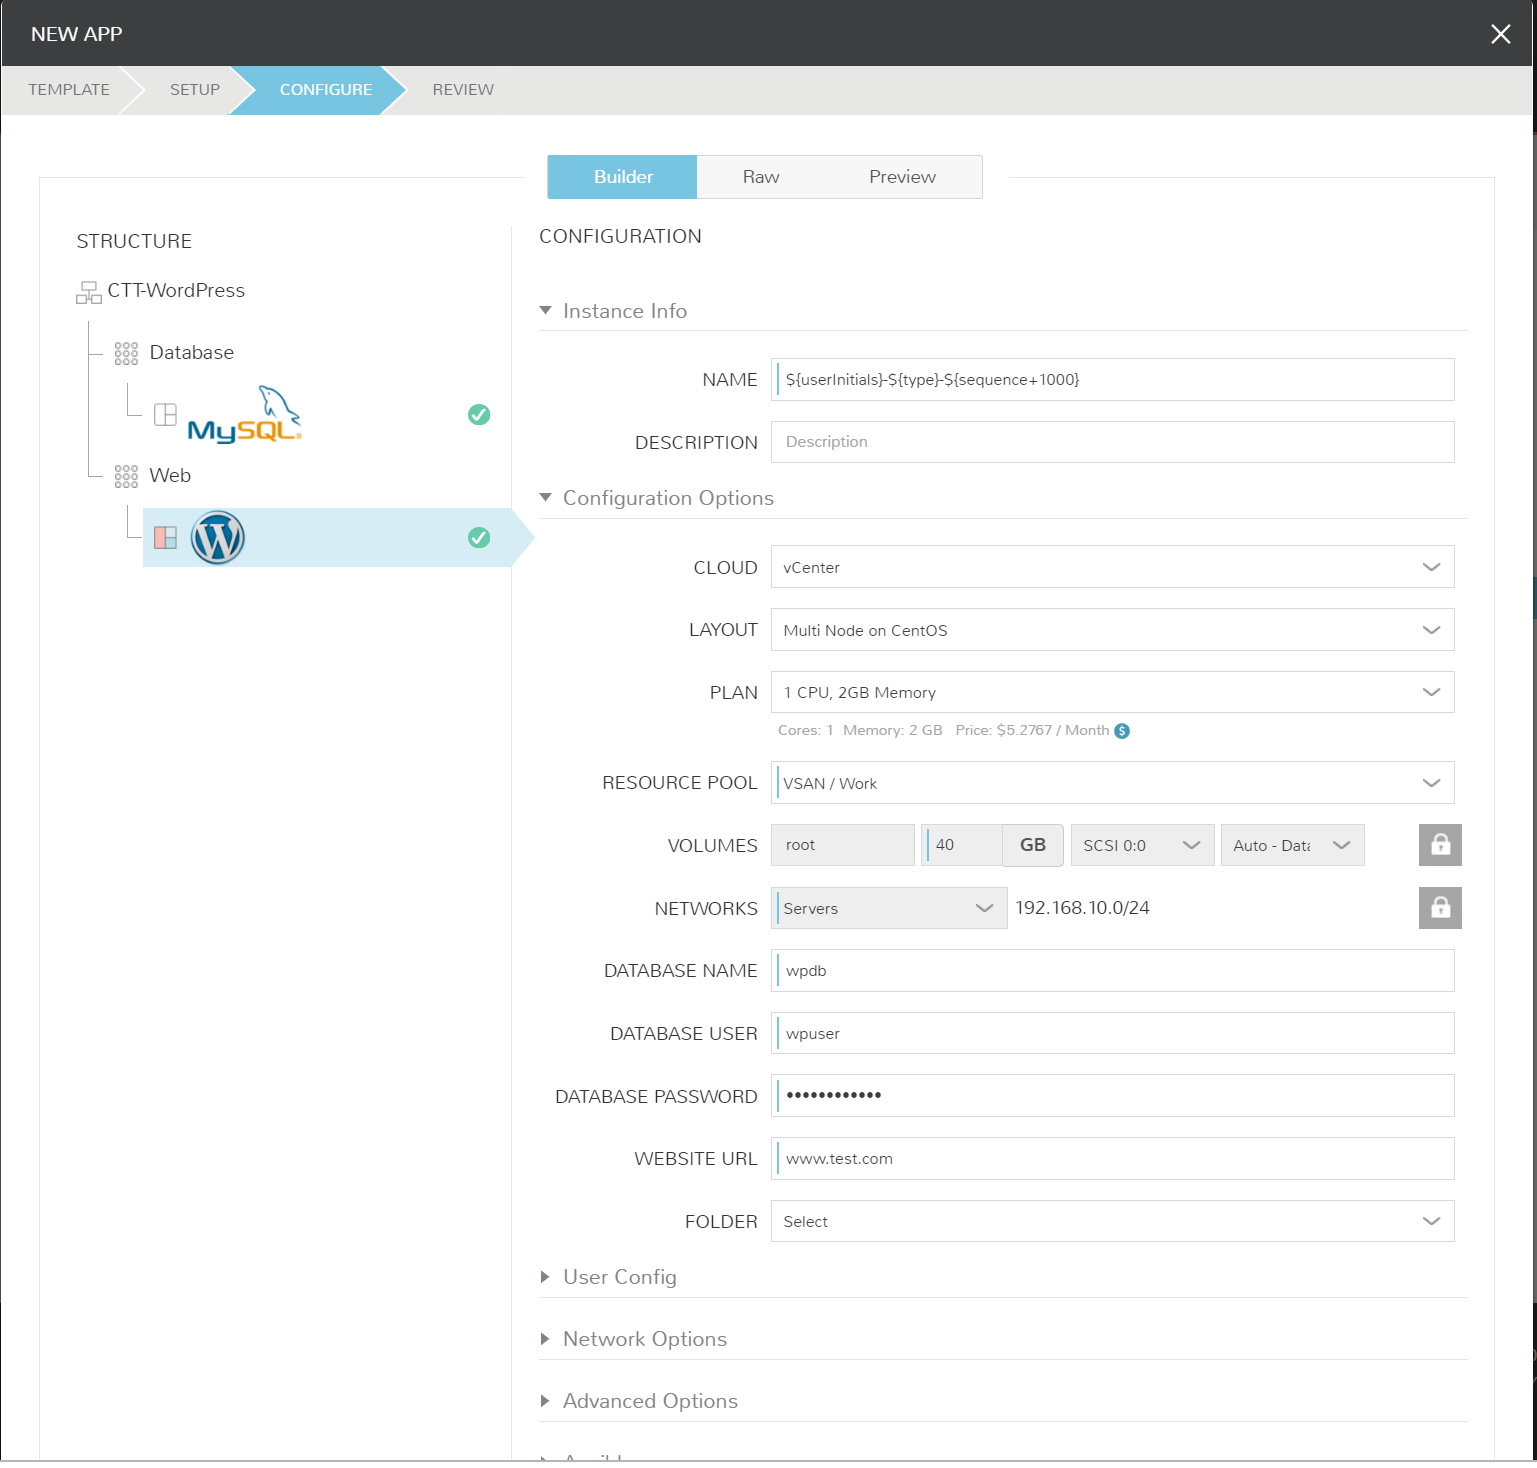
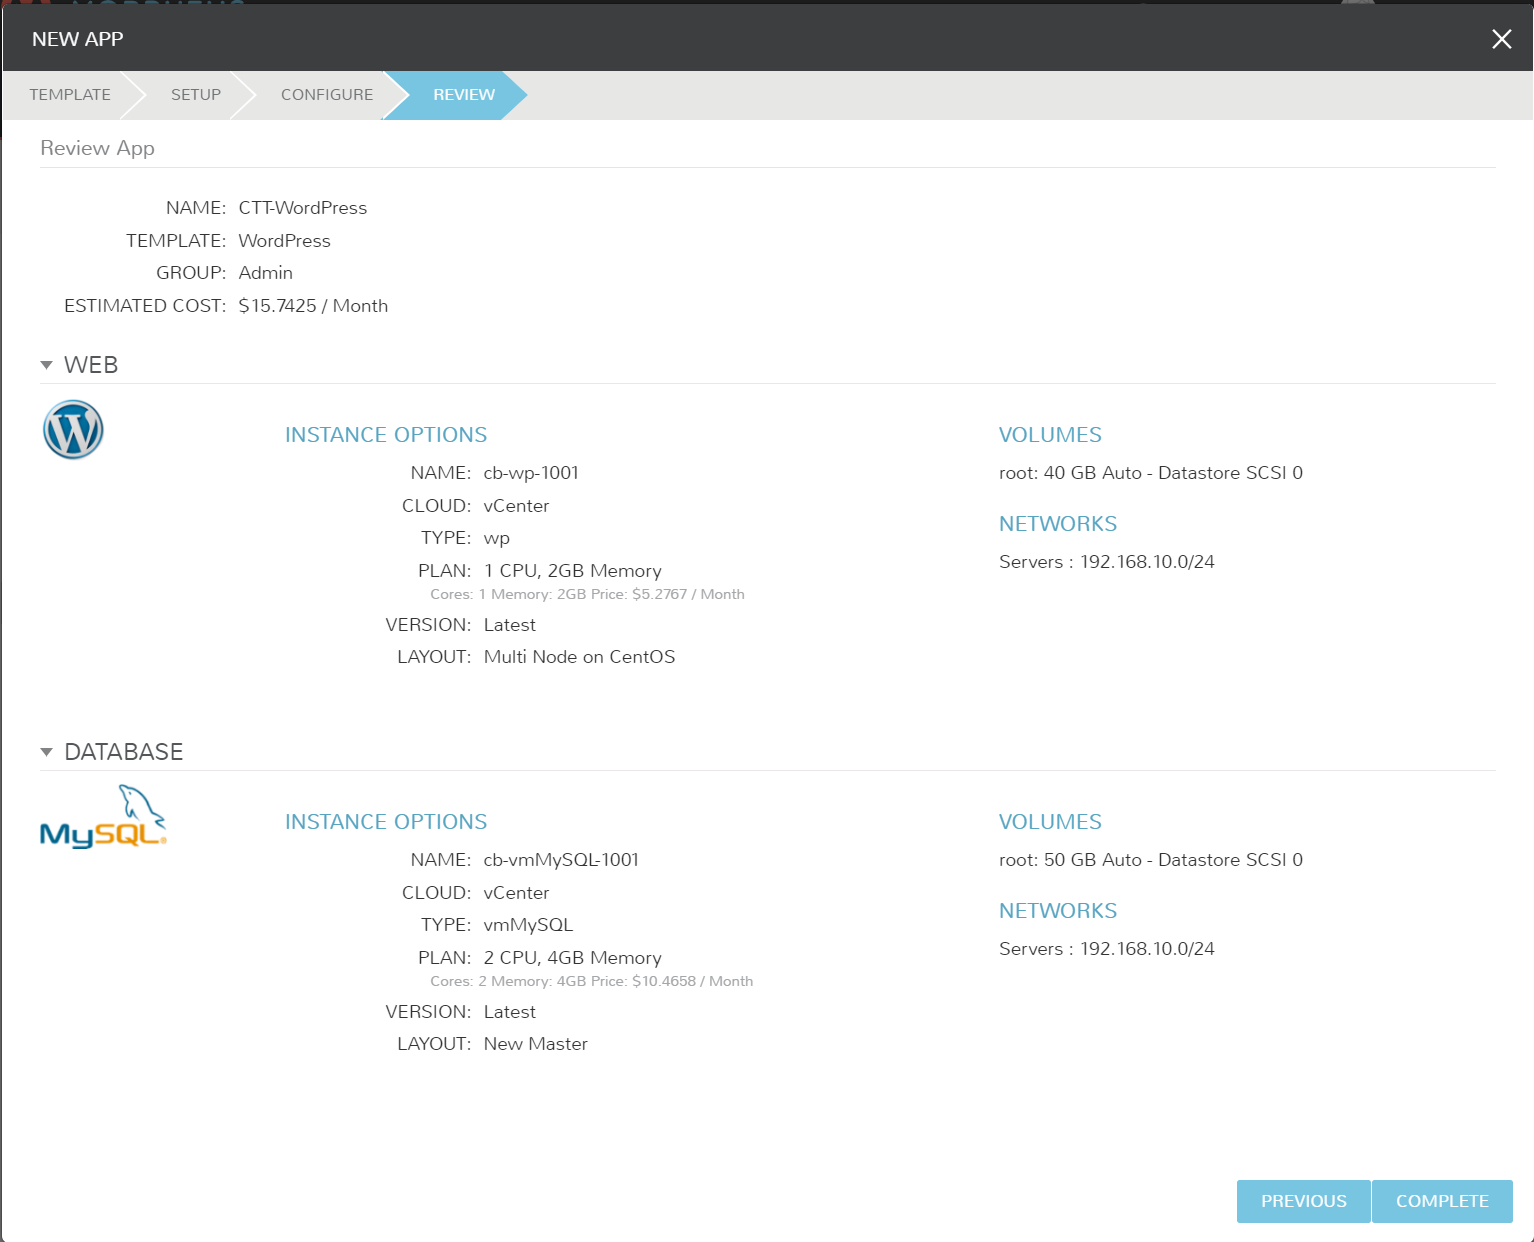
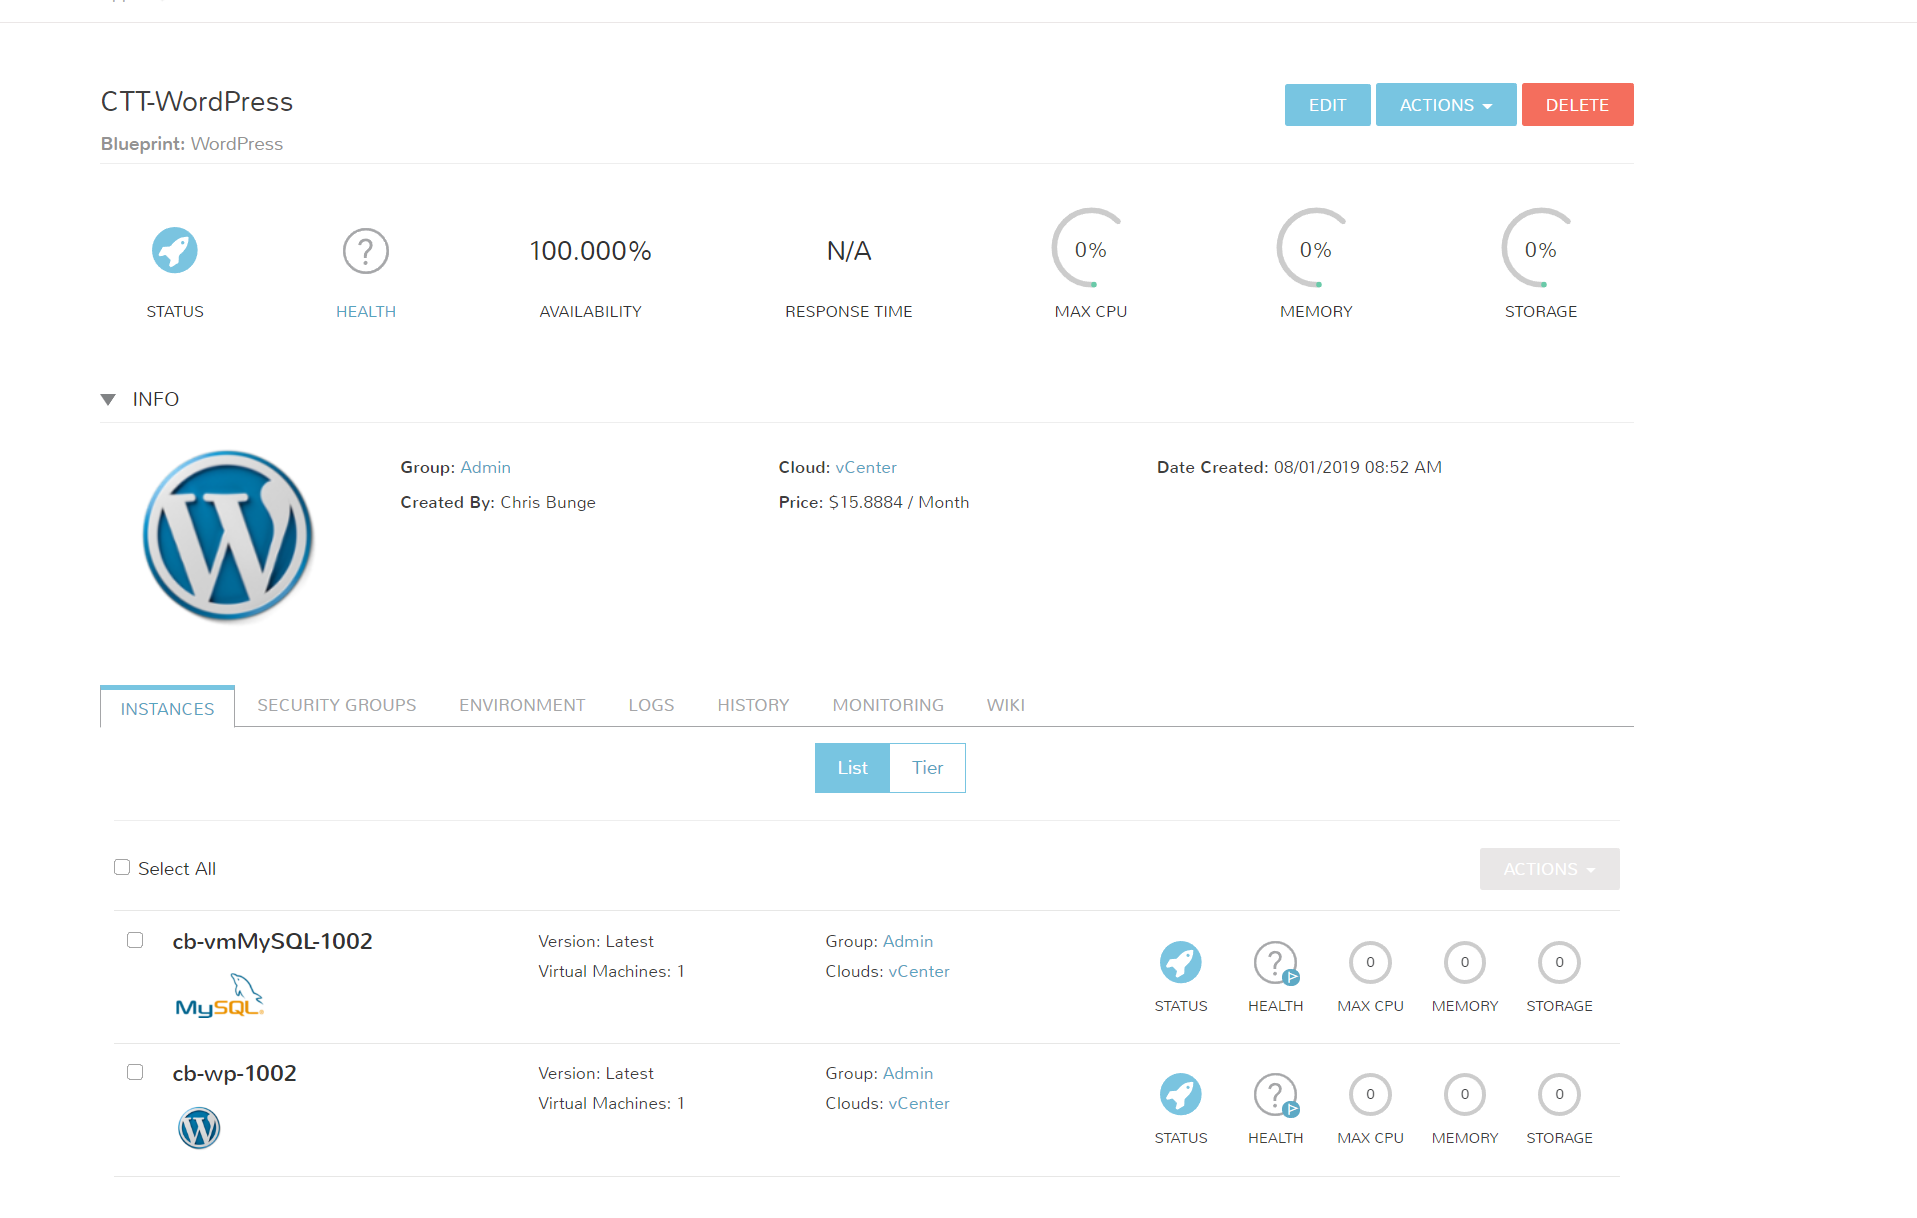
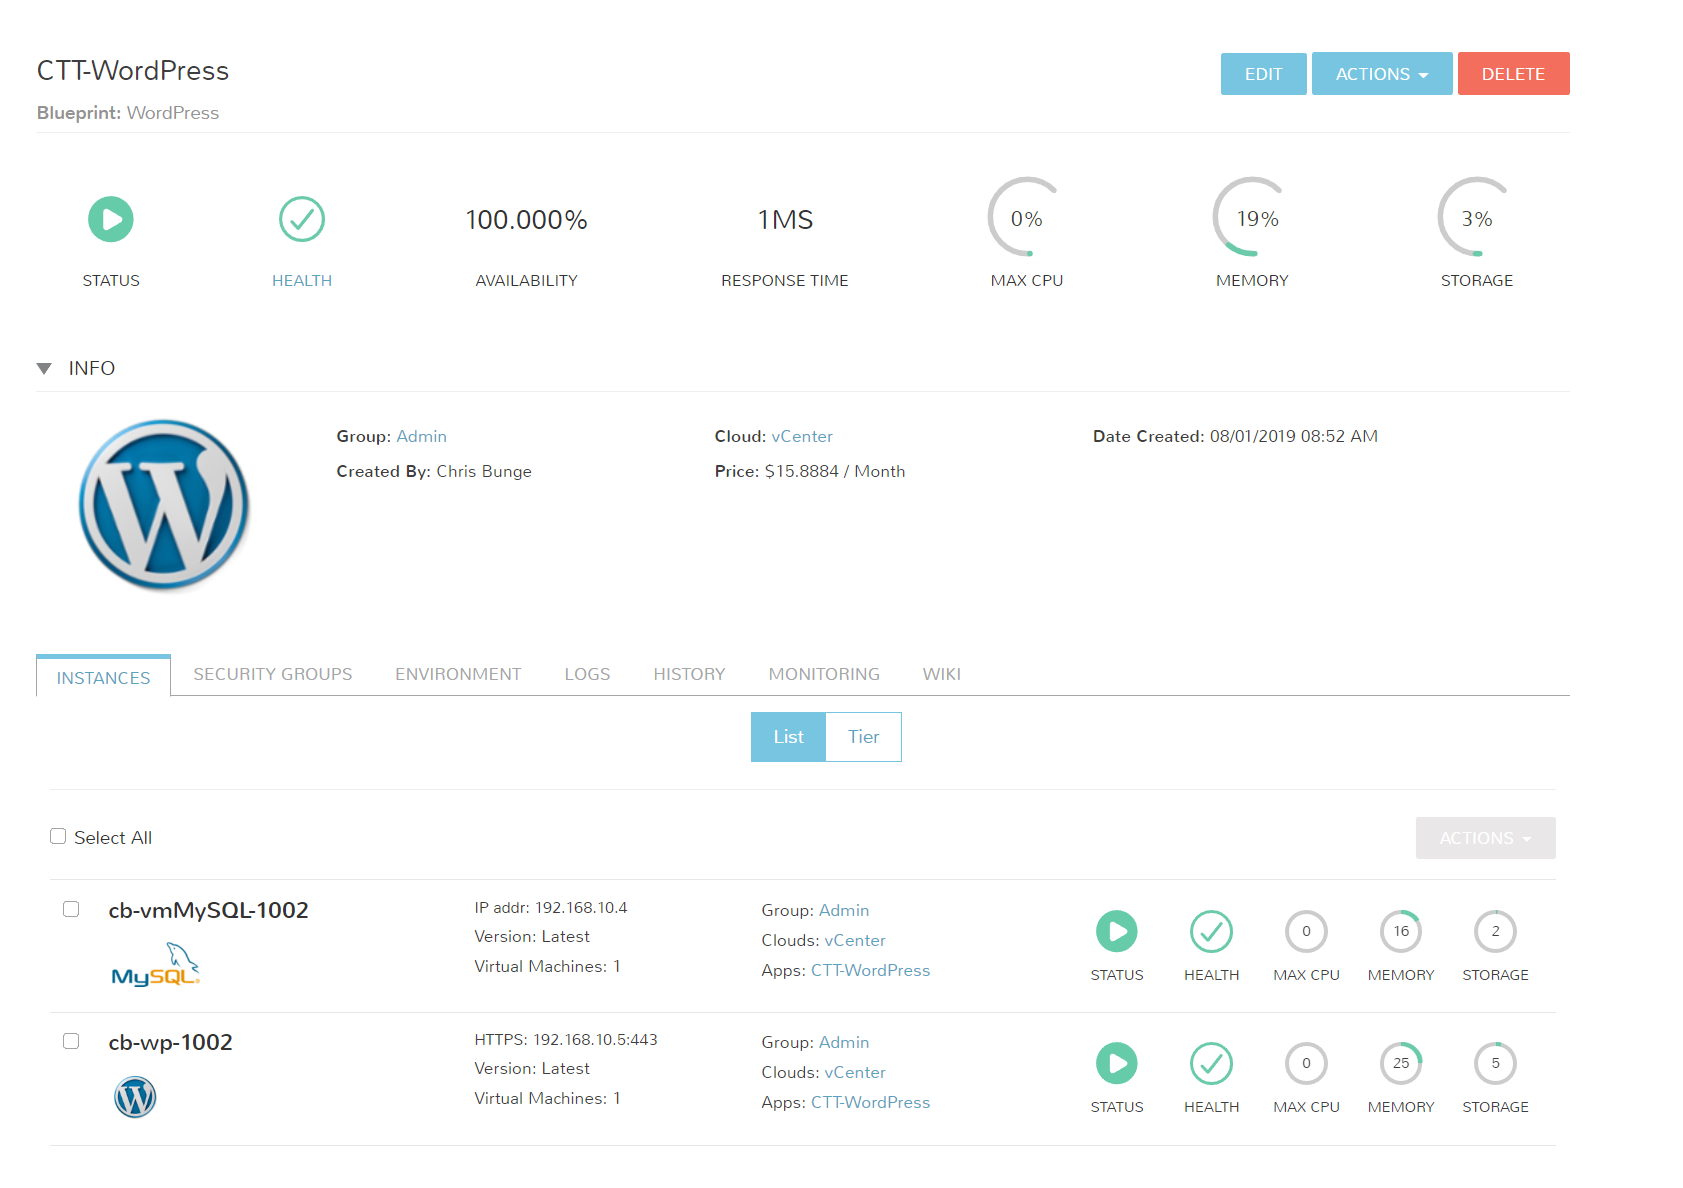
Congrats! You’ve just created your first multi-tiered application in Morpheus. Let’s test a deployment and see it in action.
Navigate to Provisioning > Applications and add a new WordPress application. Ensure any required fields are filled out and deploy your app!

Wrapping Up
Blueprints and Applications hold a lot of value within Morpheus. Repeatable configurations can be defined for all of your apps, and configured on multiple clouds per Blueprint. Options or settings can be locked or left as user configurable for even more control.
Companies are looking for agility and trying to avoid that vendor lock. Once, created and deployed as an Application, the entire project becomes documented and can easily be ported between cloud vendors.


Anonyx
says:works like a charm! great work, great blog